

Industry News
Choose the Right Sanding Sticks and Grits
Whether finishing 3D prints, jewelry, or models, using loose sandpaper rounds off sharp edges and leaves permanent scratches. High-quality surface finishing requires the right structural Sanding Sticks and a disciplined progression of Grits to minimize workshop scrap rates.
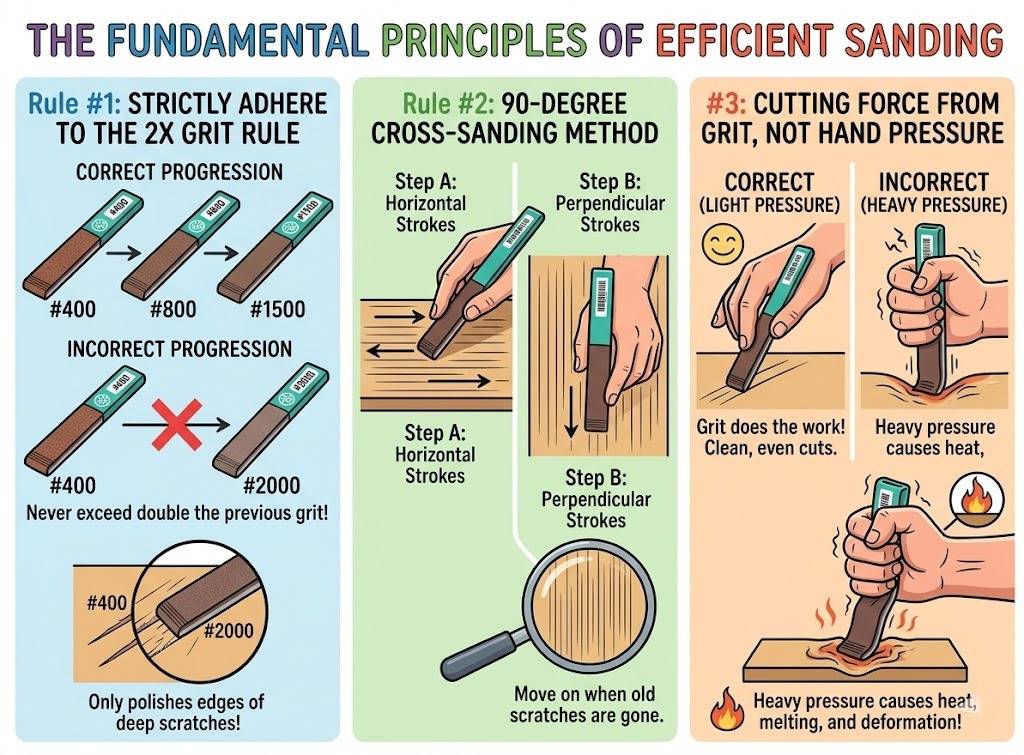
High-grit abrasives cannot eliminate excessively deep coarse scratches. They merely—and futilely—"polish" the edges of those coarse scratches. This results in an extremely unsightly finish when the surface catches light.
This allows for very intuitive observation. Are the old scratches gone? When scratches from the old direction are completely covered by finer scratches from the new direction, move on. It indicates that this stage of sanding is complete.
It causes excessive deformation of foam sanding tools. It leads to slippage on rigid tools. Heavy pressure generates frictional heat. This can burn plastics and melt resins. Light pressure yields cleaner cuts.
Quick Selection Recommendations:
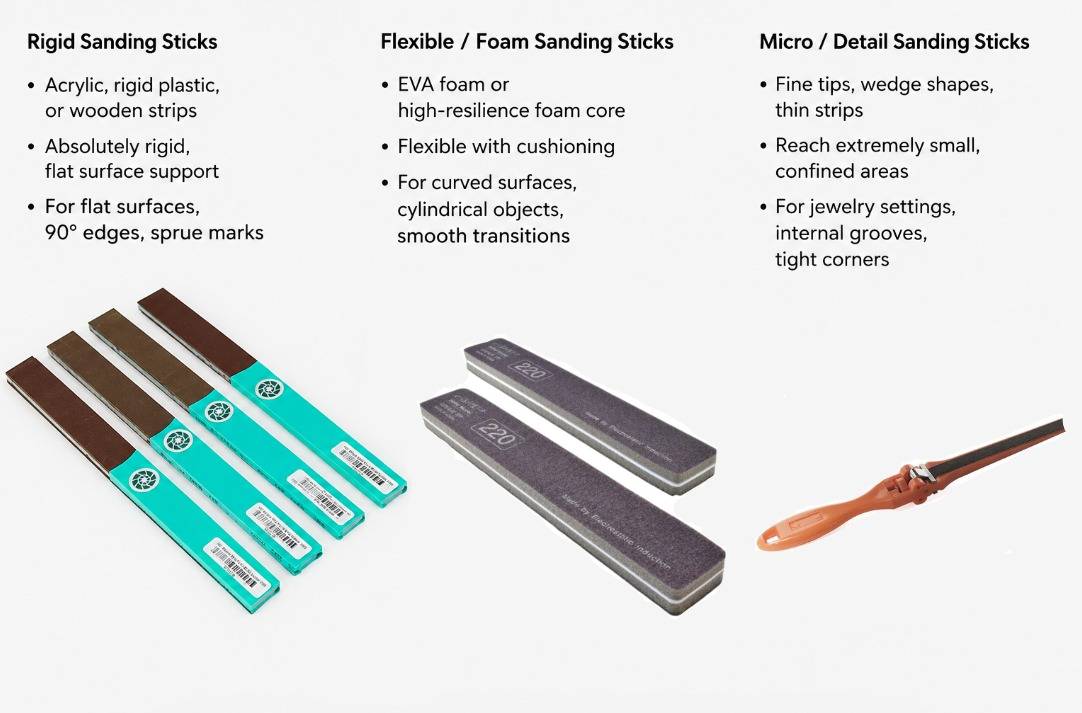
1. Choosing the Right Backing: Three Core Types of Sanding Sticks and Their Applications
Different workpiece surfaces require backing materials of varying hardness. We must select our sanding sticks based on the specific substrate or backing material. Matching structural rigidity to the target geometry prevents uneven material removal.
Rigid Sanding Sticks — Shaping and Edge Definition
- Backing Material: Acrylic, rigid plastic, or wooden strips.
- Characteristics: Absolutely rigid (non-flexing); provides extremely strong, flat surface support.
- Best Use Cases: Sanding perfectly flat surfaces, defining sharp 90-degree edges, and removing hard sprue marks.
Flexible / Foam Sanding Sticks — Conforming to Curves
- Backing Material: EVA foam or high-resilience foam core.
- Characteristics: Possesses a degree of flexibility and slight elastic cushioning.
- Best Use Cases: Curved surfaces, cylindrical objects, ergonomic grips, and surfaces requiring smooth transitions without creating artificial, sharp edges.
Micro / Detail Sanding Sticks — Tackling Tight Spots
- Backing Material: Extremely fine needle-like tips, wedge shapes, or thin strips with spring tension.
- Characteristics: Capable of reaching extremely small, confined areas.
- Best Use Cases: Crevices in jewelry settings, intricate internal grooves, and hard-to-reach internal corners within models.
2. Choosing the Right Grit: The Grit Pyramid—From Coarse Grinding to Mirror Polishing
Grit size determines the material removal rate and surface finish. Sanding is a progressive process of "replacing coarser scratches with finer ones." Skipping stages leads to surface haziness under final inspection.| Sanding Stage | Recommended Grit Range | Core Function & Purpose |
| 1. Coarse Grinding | #180 – #400 | Rapidly removes excess material (e.g., large sprue marks, severe burrs, deep scratches) and reshapes the general form of the workpiece. |
| 2. Medium Grinding | #600 – #1000 | Eliminates the deep grooves left by coarse grinding, restores surface flatness, and prepares the surface for subsequent painting or fine finishing. |
| 3. Fine Grinding | #1200 – #2500 | Eliminates all microscopic marks visible to the naked eye, resulting in a sophisticated matte or semi-gloss surface finish. |
| 4. Mirror Polishing (Ultra-Fine) | #3000 – #8000+ | Utilizes ultra-fine particles to remove the final traces of haziness, allowing metal or resin surfaces to achieve a mirror-like reflective finish. |
3. Professional Pitfall Avoidance: The Three Fundamental Principles of Efficient Sanding (The Golden Rules)
Mastering surface finishing requires strict adherence to material physics. Avoid these common workshop errors.
Rule #1: Strictly Adhere to "The 2X Rule"
When stepping up to the next grit level, the new grit number must never exceed double the previous grit number. For example: #400 -> #800 -> #1500 is correct. However, jumping directly from #400 to #2000 is a mistake.High-grit abrasives cannot eliminate excessively deep coarse scratches. They merely—and futilely—"polish" the edges of those coarse scratches. This results in an extremely unsightly finish when the surface catches light.
Rule #2: The 90-Degree Cross-Sanding Method (Directional Sanding)
Whenever you switch to the next finer sanding stick, change direction. The direction of your sanding strokes should be perpendicular (at a 90-degree angle) to the direction used in the previous step.This allows for very intuitive observation. Are the old scratches gone? When scratches from the old direction are completely covered by finer scratches from the new direction, move on. It indicates that this stage of sanding is complete.
Rule #3: Cutting Force Comes from Abrasive Grains, Not Hand Pressure
Let the grit do the work. Never press down hard on the sanding rod. Excessive pressure causes problems.It causes excessive deformation of foam sanding tools. It leads to slippage on rigid tools. Heavy pressure generates frictional heat. This can burn plastics and melt resins. Light pressure yields cleaner cuts.
Conclusion
There are no shortcuts to sanding. The right tools protect the workpiece's shape. The right grit determines the final texture.Quick Selection Recommendations:
- If you need to process angular workpieces ➔ Prioritize hard acrylic sanding rods, starting with 400 grit.
- If you need to process rounded surfaces or polish ➔ Prioritize soft sponge sanding rods, increasing grit up to 3000 grit and above.