

Industry News
How to Achieve a Mirror Finish Polishing Rings of Platinum
Achieving a true mirror finish on a platinum ring is notoriously difficult because platinum behaves unlike any other precious metal. Approaching it like gold or silver inevitably results in a hazy, drag-marked surface. This guide covers the exact tools, abrasive sequences, and bench techniques needed for a scratch-free luster.
Polishing platinum is fundamentally different from finishing gold or sterling silver. Platinum alloys (commonly Pt950 and Pt900) possess extreme density, high tensile strength, and remarkable ductility. Treating them with standard buffing techniques guarantees frustrating results at the bench.
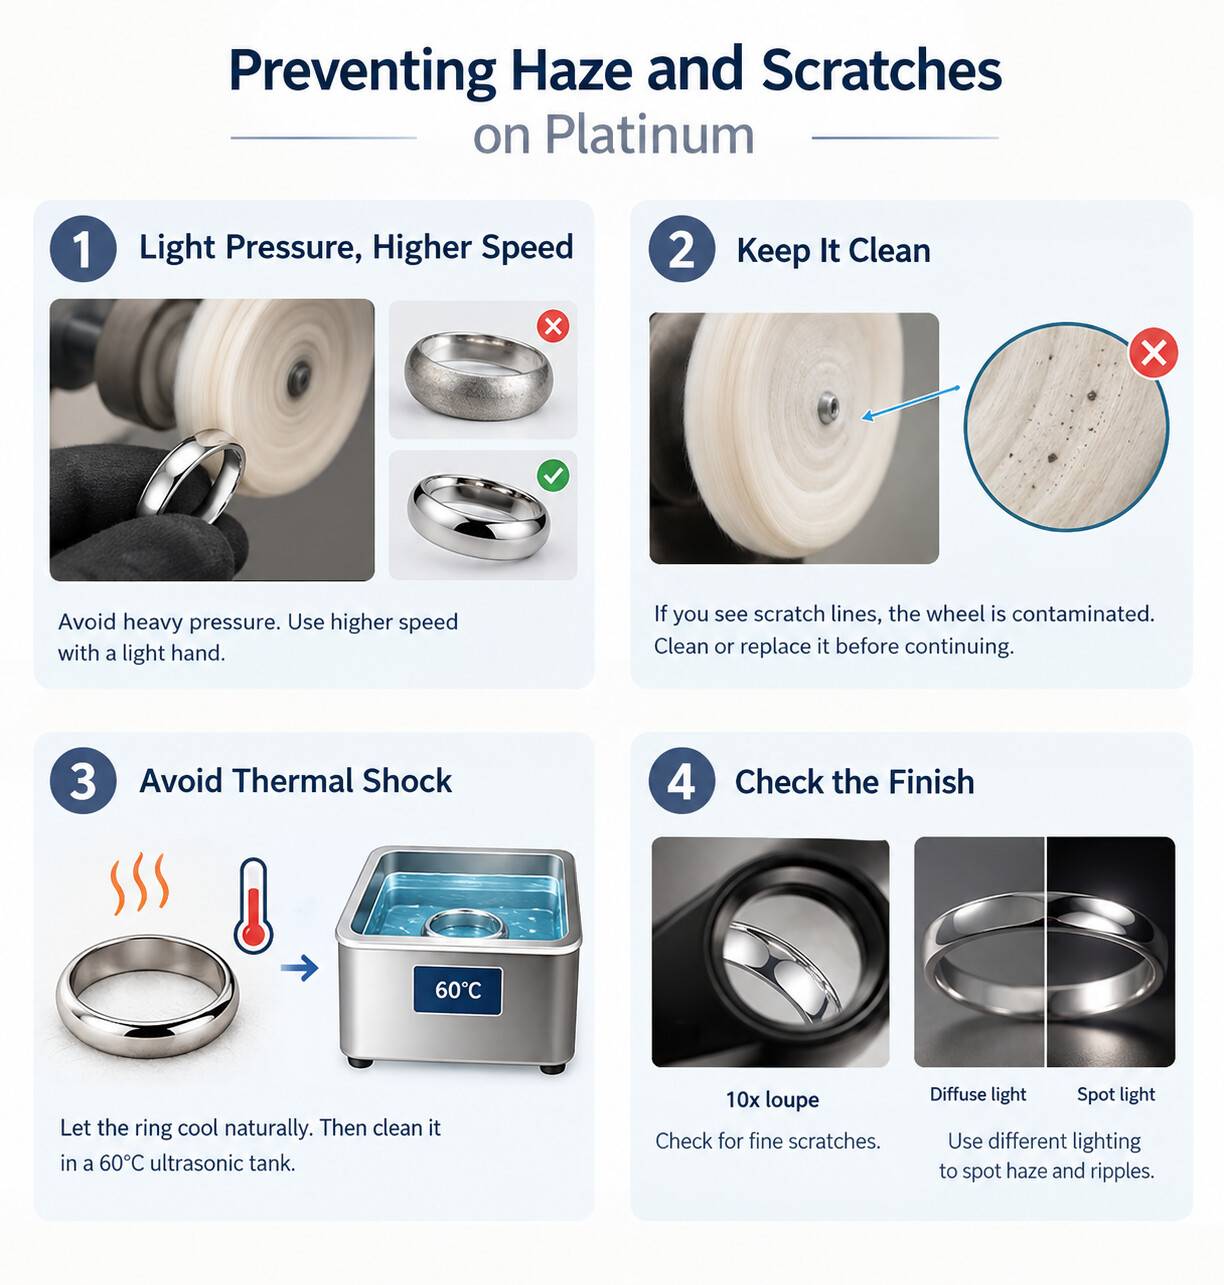
Even seasoned metalsmiths occasionally encounter a cloudy haze or phantom scratches on platinum. Here is how to diagnose, fix, and prevent the most common finishing issues:
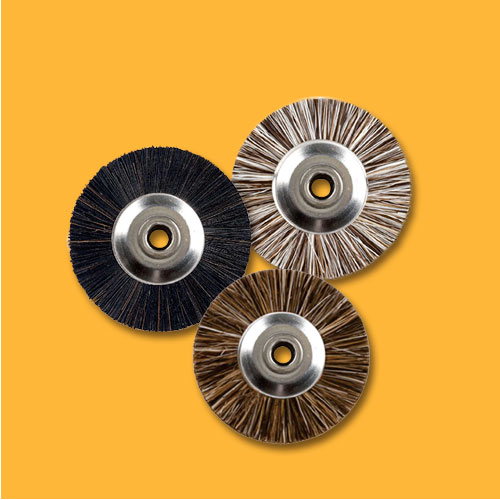
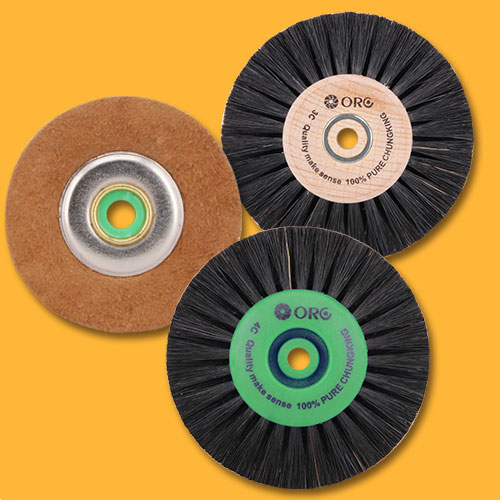
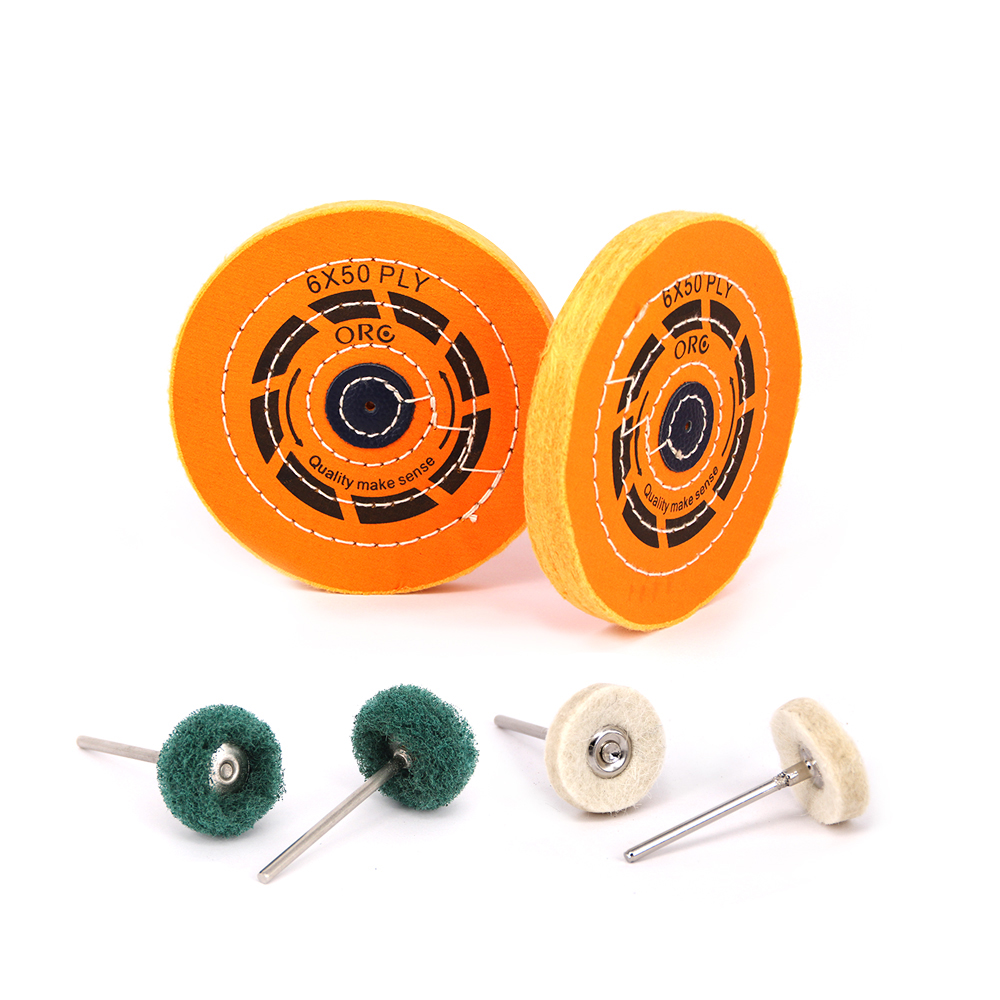
Reliable results start with clean, well-manufactured abrasives and buffs. For precision workshops, manufacturing jewelers, and bench professionals, Orobrush provides a complete line of high-performance jewelry polishing wheels, felt bobs. Supporting both bulk orders and custom private labeling, Orobrush supplies the purpose-built tools needed to deliver pristine, gallery-grade finishes on platinum, gold, and fine alloys.
I.Why Platinum Rings Require Different Polishing
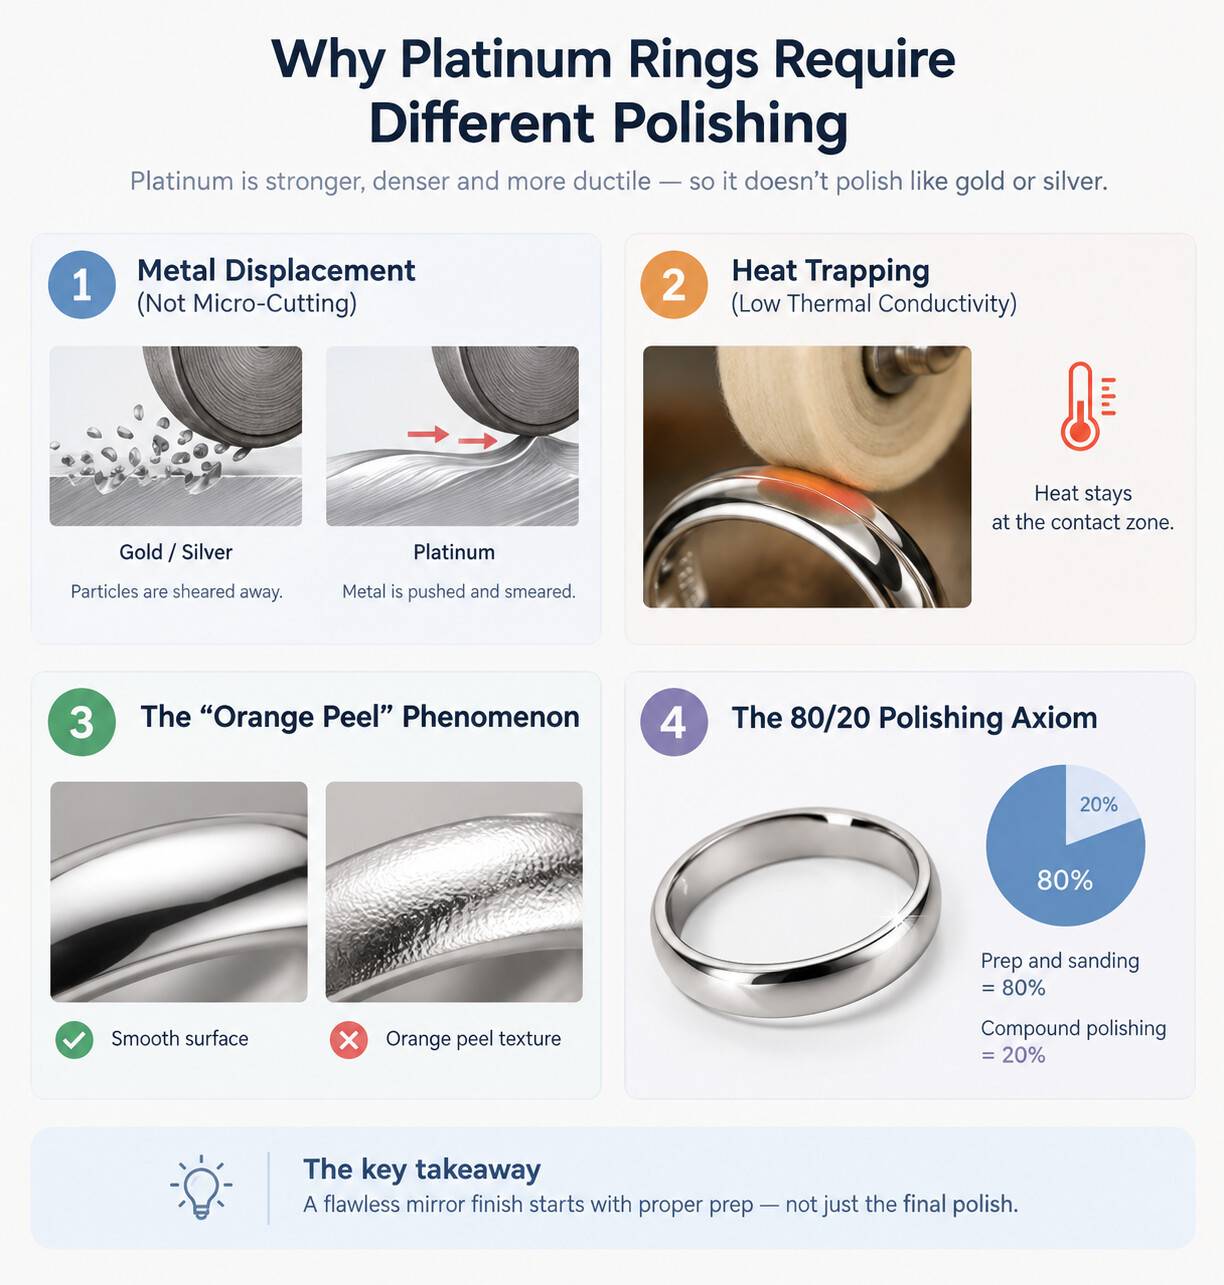
Polishing platinum is fundamentally different from finishing gold or sterling silver. Platinum alloys (commonly Pt950 and Pt900) possess extreme density, high tensile strength, and remarkable ductility. Treating them with standard buffing techniques guarantees frustrating results at the bench.
- Metal Displacement vs. Micro-Cutting: Gold and silver wear away through microscopic abrasion—tiny particles are sheared away cleanly during the cut. Platinum, by contrast, resists abrasion. Instead of chipping away, the metal molecules displace, meaning the surface is pushed, dragged, and smeared under friction. This extreme malleability leaves platinum exceptionally prone to microscopic "drag lines" that trap shadow and kill specular reflection.
- Thermal Trapping (Heat Accumulation): Platinum exhibits significantly lower thermal conductivity than gold or silver. Friction heat generated at the point of contact does not dissipate across the ring shank; it stays locked at the contact zone. This localized thermal spike can instantly carbonize polishing compounds, causing binder waxes to burn, sinter, and bake onto the workpiece, resulting in persistent dull spots and gray hazing.
- The "Orange Peel" Phenomenon: When bench jewelers encounter stubborn tool marks, the common instinct is to apply extra hand pressure against the wheel. On platinum, excessive force deforms the alloy’s crystalline structure unevenly. Softer crystal planes yield while harder grain boundaries resist, producing an irregular, wavy texture resembling an orange peel under direct light.
- The 80/20 Polishing Axiom: Eighty percent of a flawless mirror finish is achieved before a single polishing compound touches the metal. Polishing compounds only refine sub-micron surface profiles—they cannot grind away structural flaws. Attempting to buff out scratches left behind by coarse abrasives will only round crisp bezel edges, dish out prong bases, and leave ghost scratches floating beneath an uneven sheen.
II. Essential Tools for Polishing Platinum Rings
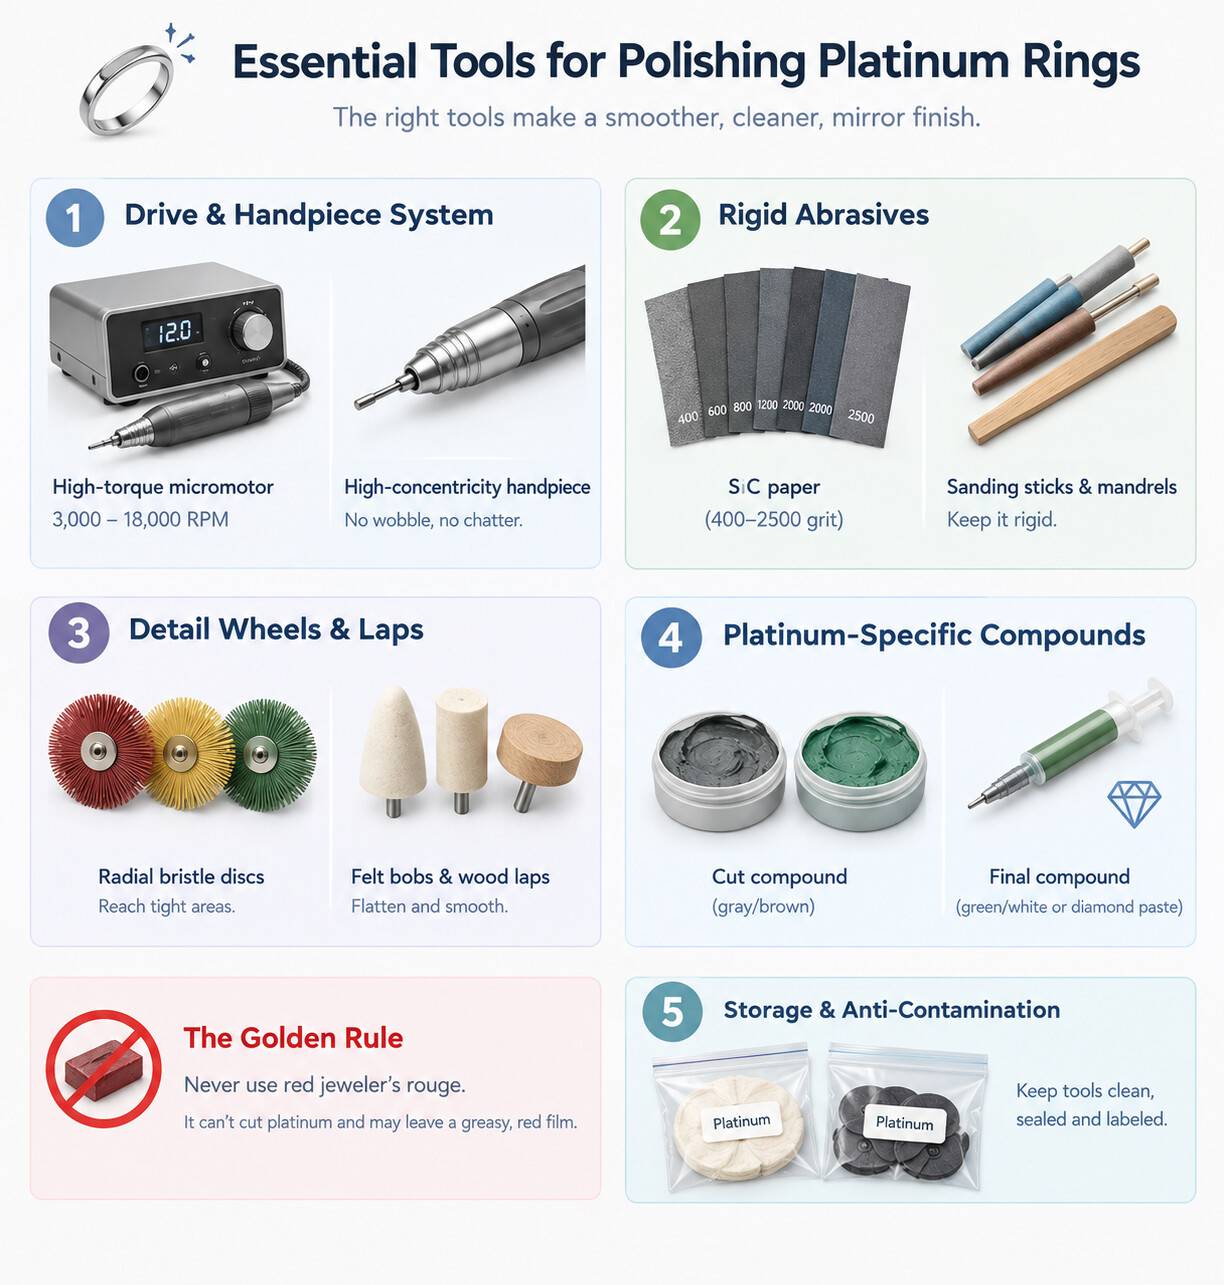
Because platinum does not cut easily, your bench setup must deliver rigidity, true concentricity, and contamination-free consumables.
1. Drive & Handpiece System
- High-Torque Micromotor: You need consistent torque across a stepless variable-speed range of 3,000 to 18,000 RPM. Traditional flexible shaft machines often bog down at lower speeds or whip during delicate detail work; a dedicated brushless bench micromotor maintains steady rotational speed without stalling.
- High-Concentricity Rotary Handpiece: A handpiece with near-zero radial runout is non-negotiable. Any minute wobble or collet vibration translates directly onto the convex curvature of a ring shank, creating rhythmic chatter marks (a washboard texture) that are agonizing to sand out later.
2. Rigid Abrasives
- Waterproof Silicon Carbide (SiC) Paper: Work strictly in graded steps: 400, 600, 800, 1200, 2000, and 2500 grit. Silicon carbide grains fracture cleanly to present sharp cutting facets against gummy platinum alloys.
- Rigid Sanding Sticks & Backing Mandrels: Always wrap your sandpaper around precision ground-steel mandrels or flat, hard wooden sanding sticks. Never use unbacked fingers or soft foam pads—soft backing conforms to the metal’s soft spots, rounding off crisp design lines, washing out channel edges, and softening clean chamfers.
3. Specialized Detail Wheels & Laps
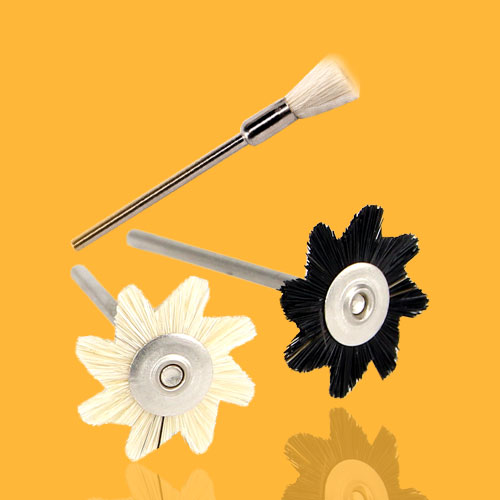
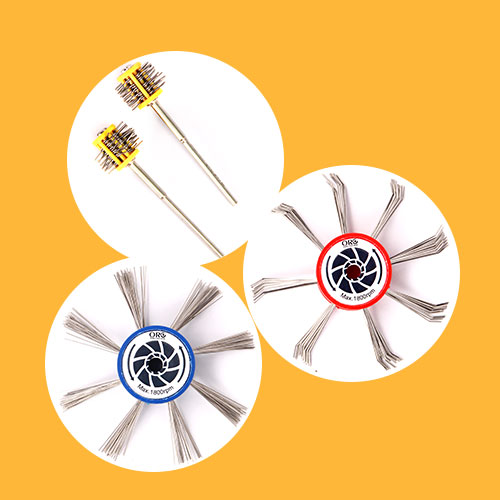
- Radial Bristle Discs: Multi-layered radial bristle discs (progressing from medium red to fine yellow and ultra-fine green) are essential for reaching difficult areas. The flexible bristles conform around prong galleries, openwork filigree, and under-bezel cavities without dulling sharp prongs or thinning stone seats.
- Hard Felt Bobs & Wood Laps: Rock-hard compressed felt cones, cylinders, and end-grain wood laps provide an unyielding surface that flattens external ring curves without creating waves.
4. Platinum-Specific Compounds
- Coarse Pre-Polish / Cut Compound: Use specialized gray or brown cutting waxes formulated with calcined aluminum oxide or micro-graded silicon carbide. These cut cleanly through 2000-grit marks without melting into the metal.
- Final Mirror-Finish Compound: Choose a dedicated green or ultra-fine white aluminum oxide compound, or use a 0.5 to 1.0-micron oil-based diamond paste. Diamond paste is especially effective because synthetic diamond particles retain sharp cutting facets under the high temperatures generated by platinum friction.
- The Golden Rule: Never use standard red jeweler’s rouge. Rouge is composed of soft ferric oxide formulated for gold and silver; it cannot cut platinum. Instead, the oily binder burns into the metal’s surface, leaving a greasy, red-tinted film that contaminates the pores.
5. Storage & Anti-Contamination Protocols
Platinum buffs must be treated as cleanroom tools. A single fleck of gold, silver, or loose steel dust embedded in a muslin wheel will score platinum instantly. Store all platinum wheels, bobs, and discs in labeled, sealed zip bags or dedicated plastic organizers, away from general bench dust.III. Step-by-Step Platinum Ring Polishing Guide
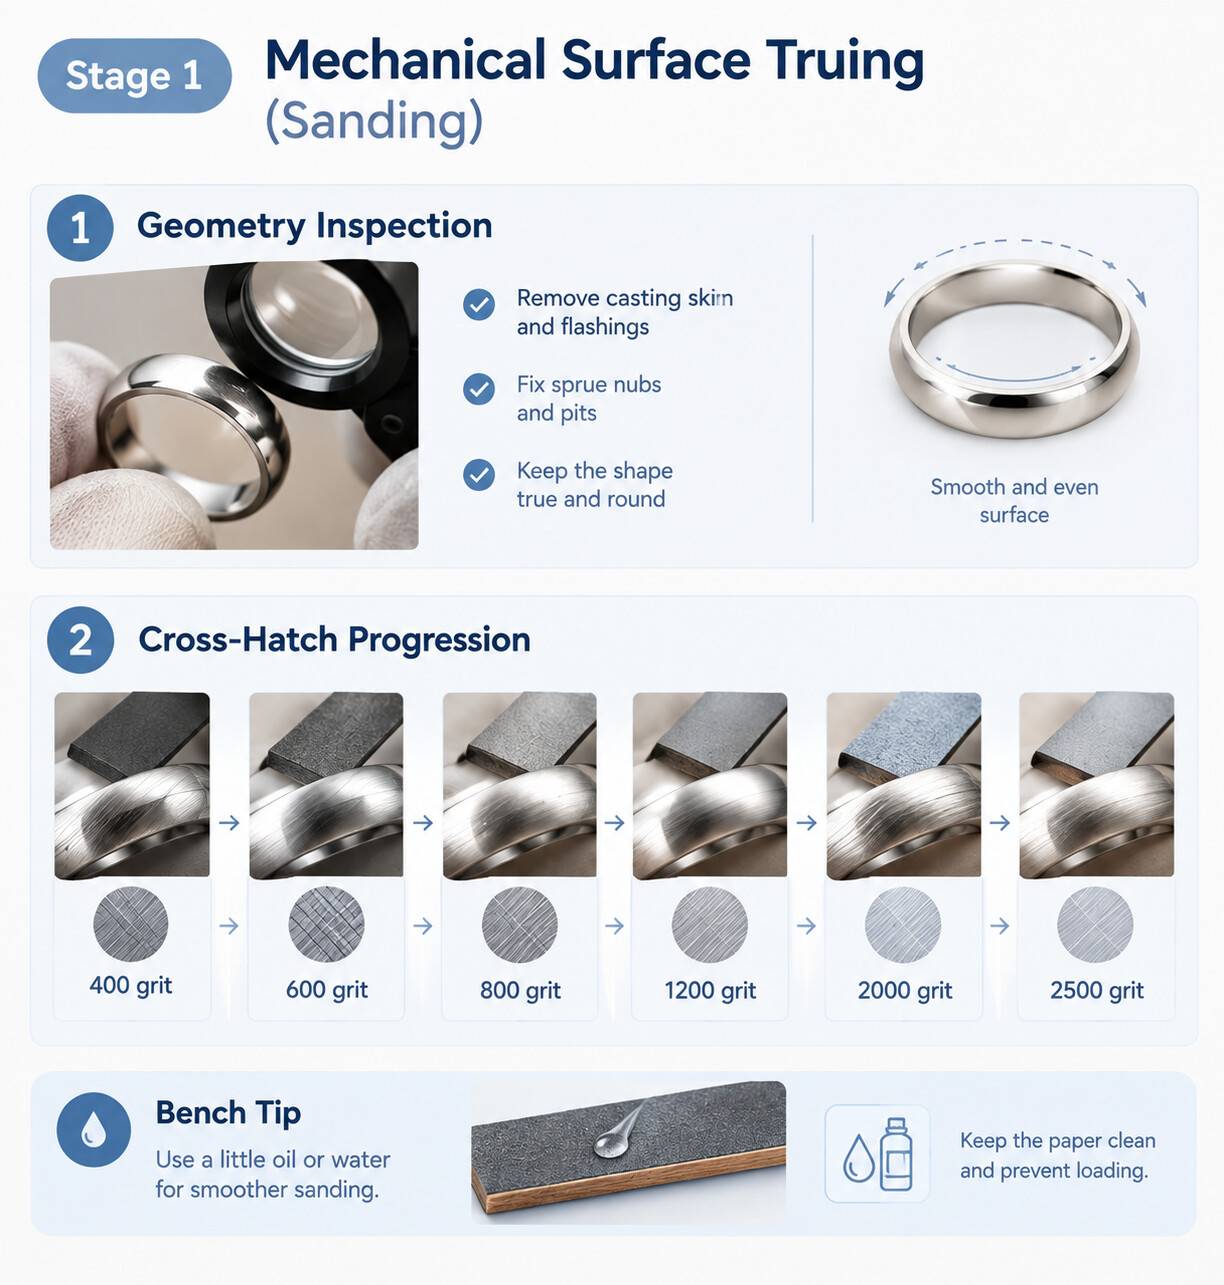
Follow this phased workshop procedure to achieve consistent, optical-grade clarity on plain bands, signets, or intricate bridal mountings.Stage 1: Mechanical Surface Truing (Sanding)
- Geometry Inspection: Examine the ring under magnification. Use a fine precision file to remove casting skin, flashings, sprue nubs, and porosity pits. Ensure flat facets are planar and the outer shank curvature is concentric.
- Cross-Hatch Progression:
- Begin with 400-grit wet/dry paper mounted on a rigid stick. Sand strictly diagonally across the shank in one uniform direction until all file marks are erased.
- Switch to 600-grit, rotating the ring 90 degrees to cross-hatch across the previous lines. Sand only until the 400-grit scratch pattern is completely replaced.
- Progress systematically through 800, 1200, 2000, and 2500 grit, rotating your angle 90 degrees at each step.
- Bench Tip: Apply a small droplet of mineral oil, water, or commercial diamond extender fluid to the paper. Lubrication keeps abrasive channels clear and stops displaced platinum particles from loading into the paper and gouging the metal.
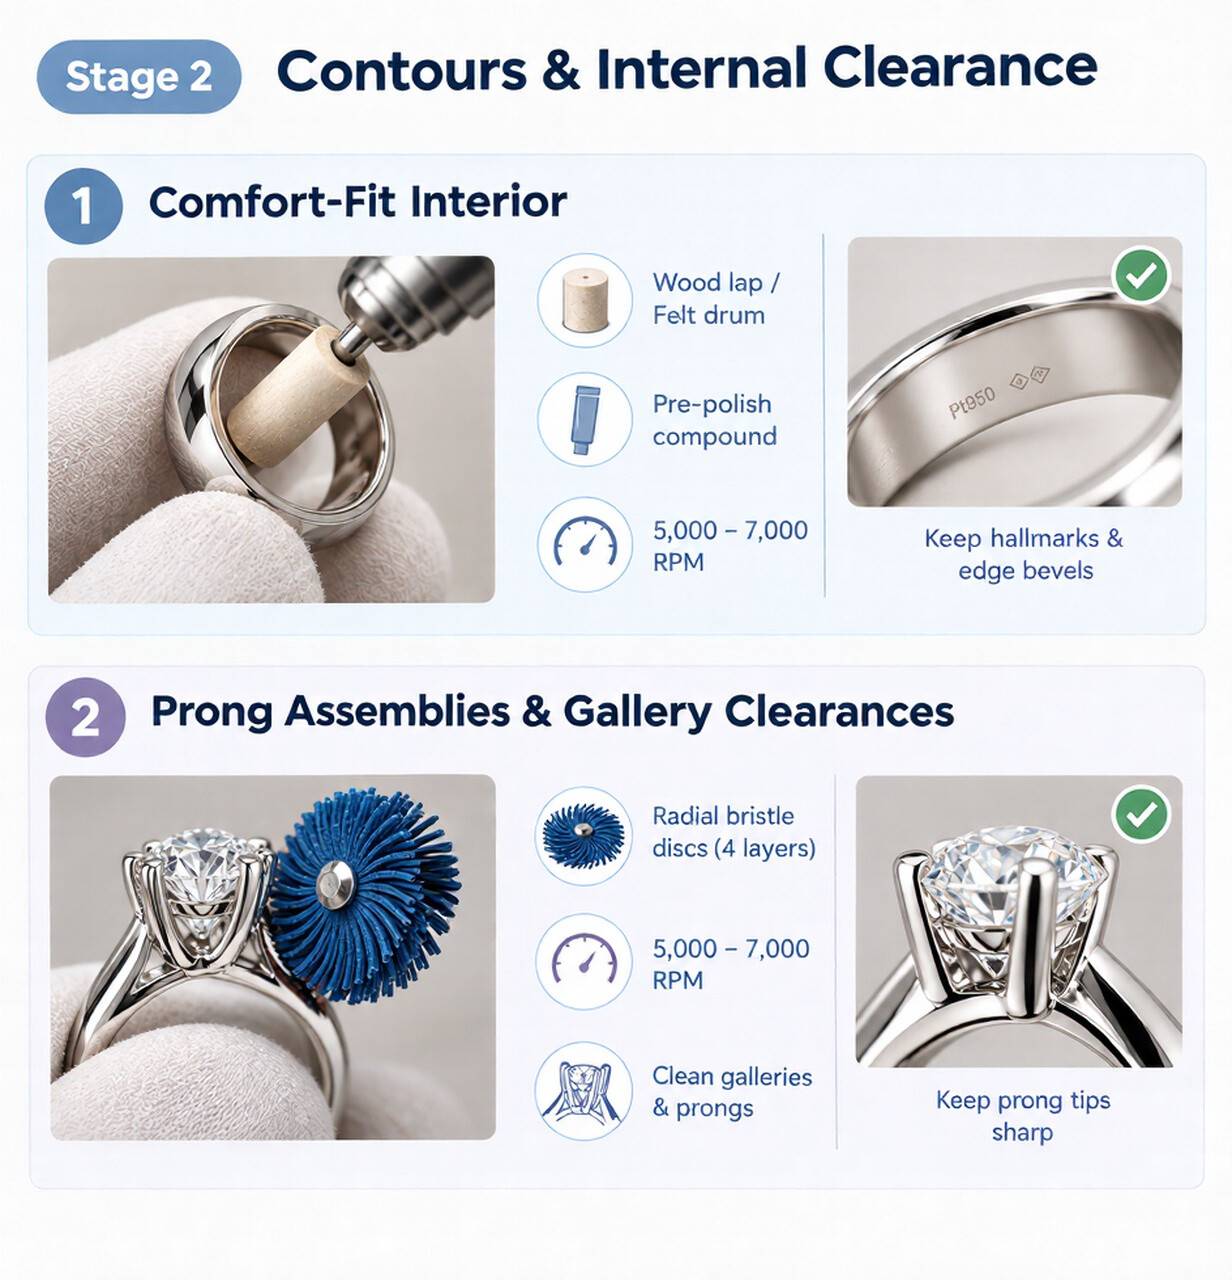
Stage 2: Contours & Internal Clearance
- Comfort-Fit Interior: Mount a cylindrical wood lap or rock-hard felt drum onto your rotary handpiece. Coat it lightly with pre-polish compound and run it at 5,000 to 7,000 RPM. Sweep steadily through the inside of the ring band, taking care to preserve stamped hallmarks, serial numbers, and interior edge bevels.
- Prong Assemblies & Gallery Clearances: Mount a four-ply stack of radial bristle discs on a mandrel. Operating at 5,000 to 7,000 RPM, use quick, sweeping strokes to sweep through the underside of the setting, between gallery wires, and down the flanks of the prongs. The flexible bristles clean away firecoat and micro-burrs without rounding the prong tips needed to secure gemstones.
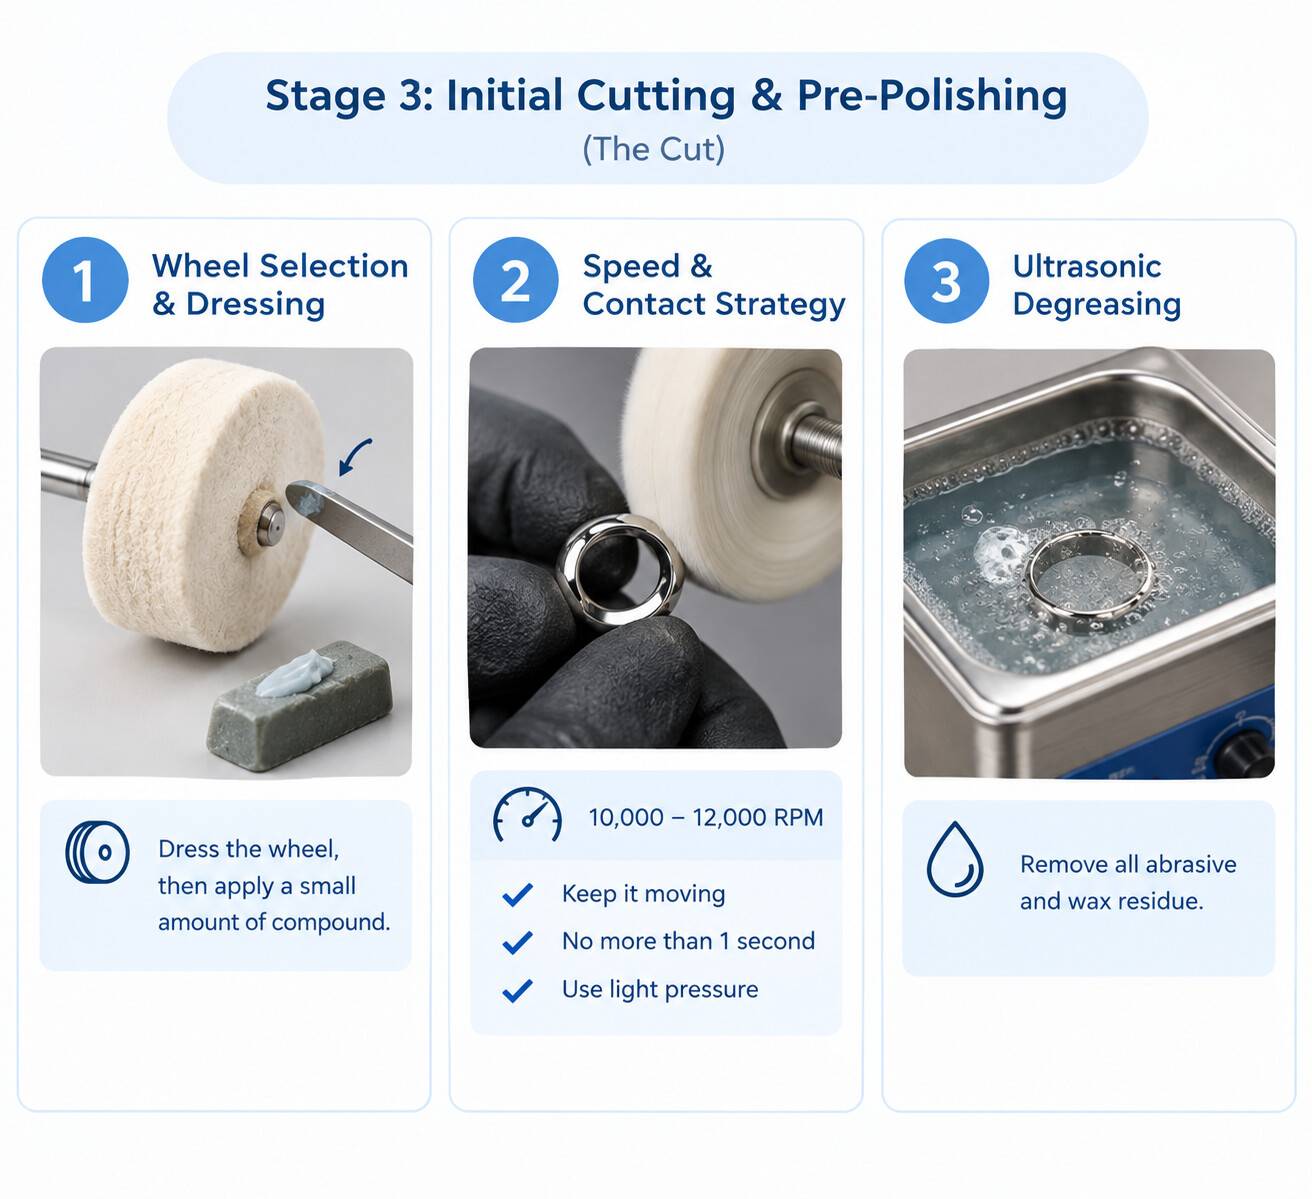
Stage 3: Initial Cutting & Pre-Polishing (The Cut)
- Wheel Selection & Dressing: Select a dense, rock-hard compressed felt cylinder or a tightly stitched 3-inch cotton buff. Dress the spinning wheel lightly against a rake, then touch your dedicated platinum cutting compound to the face for two seconds. Use compound sparingly—a light, waxy sheen is all you need.
- Speed & Contact Strategy: Adjust the handpiece to 10,000–12,000 RPM. High peripheral surface speed cuts platinum cleanly, but friction must be managed:
- Keep the ring moving dynamically against the wheel.
- Never let the wheel dwell in one spot for more than one second.
- Use light, rhythmic contact strokes. Heavy pressure will create thermal drag lines, pulling the metal into waves.
- Ultrasonic Degreasing: Before advancing to the final finish, submerge the ring in an ultrasonic cleaner. You must eliminate every trace of coarse cutting abrasive and binder wax from the ring's crevices; carrying a single coarse grain over to the finishing wheel will drag deep scratches across the finished surface.
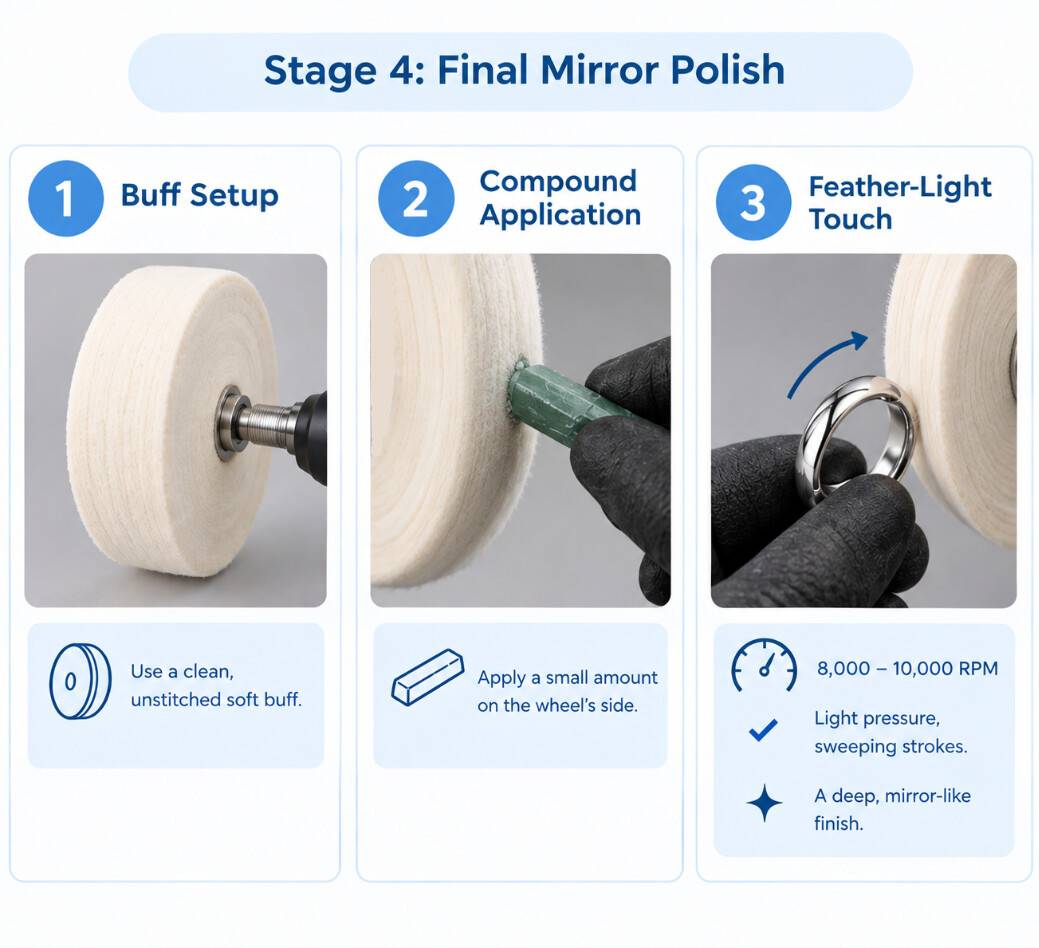
Stage 4: Final Mirror Polish
- Buff Setup: Mount a virgin, completely unstitched soft muslin wheel or a premium unbleached flannel buff. Dedicate this buff solely to final platinum finishing.
- Compound Application: Coat the buff face with a tiny amount of ultra-fine white/green alumina compound or 0.5-micron diamond compound.
- The Feather-Light Touch: Set your tool to 8,000–10,000 RPM. Bring the ring toward the lower quadrant of the buff using feather-light, sweeping strokes. Do not push the metal into the wheel; let the centrifugal force of the fibers and the micro-crystalline abrasive glaze the metal surface. In just a few passes, the haze will lift, revealing a deep, dark, liquid-mirror reflection.
IV. Preventing Haze and Scratches on Platinum
Even seasoned metalsmiths occasionally encounter a cloudy haze or phantom scratches on platinum. Here is how to diagnose, fix, and prevent the most common finishing issues:
1. The Pressure-Speed Trap
When a ring doesn't seem to brighten quickly, pressing harder will only make things worse. High pressure increases contact friction, driving temperatures past the melting point of the compound's binder. The displaced metal drags, tearing microscopic fissures into the surface that read visually as a milky sheen. Always favor higher wheel speeds paired with an exceptionally light hand.2. Identifying Micro-Contamination Drag Lines
If you notice erratic, curling hairline tracks ("phantom scratches") appearing during the final buffing pass, the wheel is contaminated. This is almost always caused by tiny, dislodged particles from coarse sandpaper or airborne debris from gold/silver polishing wheels.- Remedy: Stop immediately. Rake the wheel face down, trim away frayed threads, or discard the buff entirely. Clean the ring thoroughly before touching it to a clean buff.
3. Thermal Shock During Degreasing
Polishing generates intense, concentrated heat inside platinum rings. Never drop a hot platinum ring into cool water or cold ultrasonic solution. Sudden thermal shock causes rapid crystal contraction, which can craze delicate stones or stress micro-weld joints.- Allow the ring to cool down naturally to room temperature on a bench block.
- Transfer it to an ultrasonic tank heated to 60°C (140°F) filled with an ammoniated wax-dissolving cleaner. Rinse gently using a soft, natural bristle wash brush to lift spent compound without scratching the mirror-bright finish.
4. Dual-Perspective Quality Inspection
Never evaluate a platinum mirror finish solely under ambient bench lighting. Use a two-step optical audit:- Vertical 10x Loupe Inspection: Inspect the shank perpendicularly under a clean 10x triplet loupe. Verify that no linear scratch traces from the 1200 or 2000-grit sanding steps remain hidden beneath the shine.
- Dual-Lighting Check: Alternate between a soft, diffuse daylight LED panel and a high-intensity, single-point halogen or LED spotlight. Tilt the ring slowly:
- Diffuse light reveals sub-surface milkiness and uneven clouding.
- Direct point light highlights micro-rippling, drag tracks, and orange-peel waviness along the edges of the band.
Conclusion
Mastering the mirror finish on platinum rings requires uncompromised discipline throughout the mechanical preparation phase. By honoring the 80/20 rule, working through every sanding grit with rigid backing, managing friction temperatures, and using contamination-free platinum compounds, you can consistently produce a deep, distortion-free mirror luster.Reliable results start with clean, well-manufactured abrasives and buffs. For precision workshops, manufacturing jewelers, and bench professionals, Orobrush provides a complete line of high-performance jewelry polishing wheels, felt bobs. Supporting both bulk orders and custom private labeling, Orobrush supplies the purpose-built tools needed to deliver pristine, gallery-grade finishes on platinum, gold, and fine alloys.