

Industry News
How to Use a Bench Grinder Buffing Wheel on Jewelry
A bench grinder equipped with a dedicated buffing wheel quickly turns raw casting skin and abrasive scratches on jewelry into a mirror polish. However, its high speed and torque leave zero margin for error—an incorrect contact angle can instantly snag settings or rip the piece from your fingers. Mastering this tool comes down to pairing the right wheel-and-compound system and letting surface velocity do the cutting.
Achieving a true mirror finish requires a disciplined three-stage progression. Skipping grades or mismatching wheel density with the wrong abrasive will leave visible haze, micro-scratches, or flat spots on curved jewelry components.
A buffing wheel cannot polish jewelry properly straight out of its packaging. It must be balanced on the machine, conditioned with a rake, and charged with the exact amount of abrasive wax to prevent drag marks.
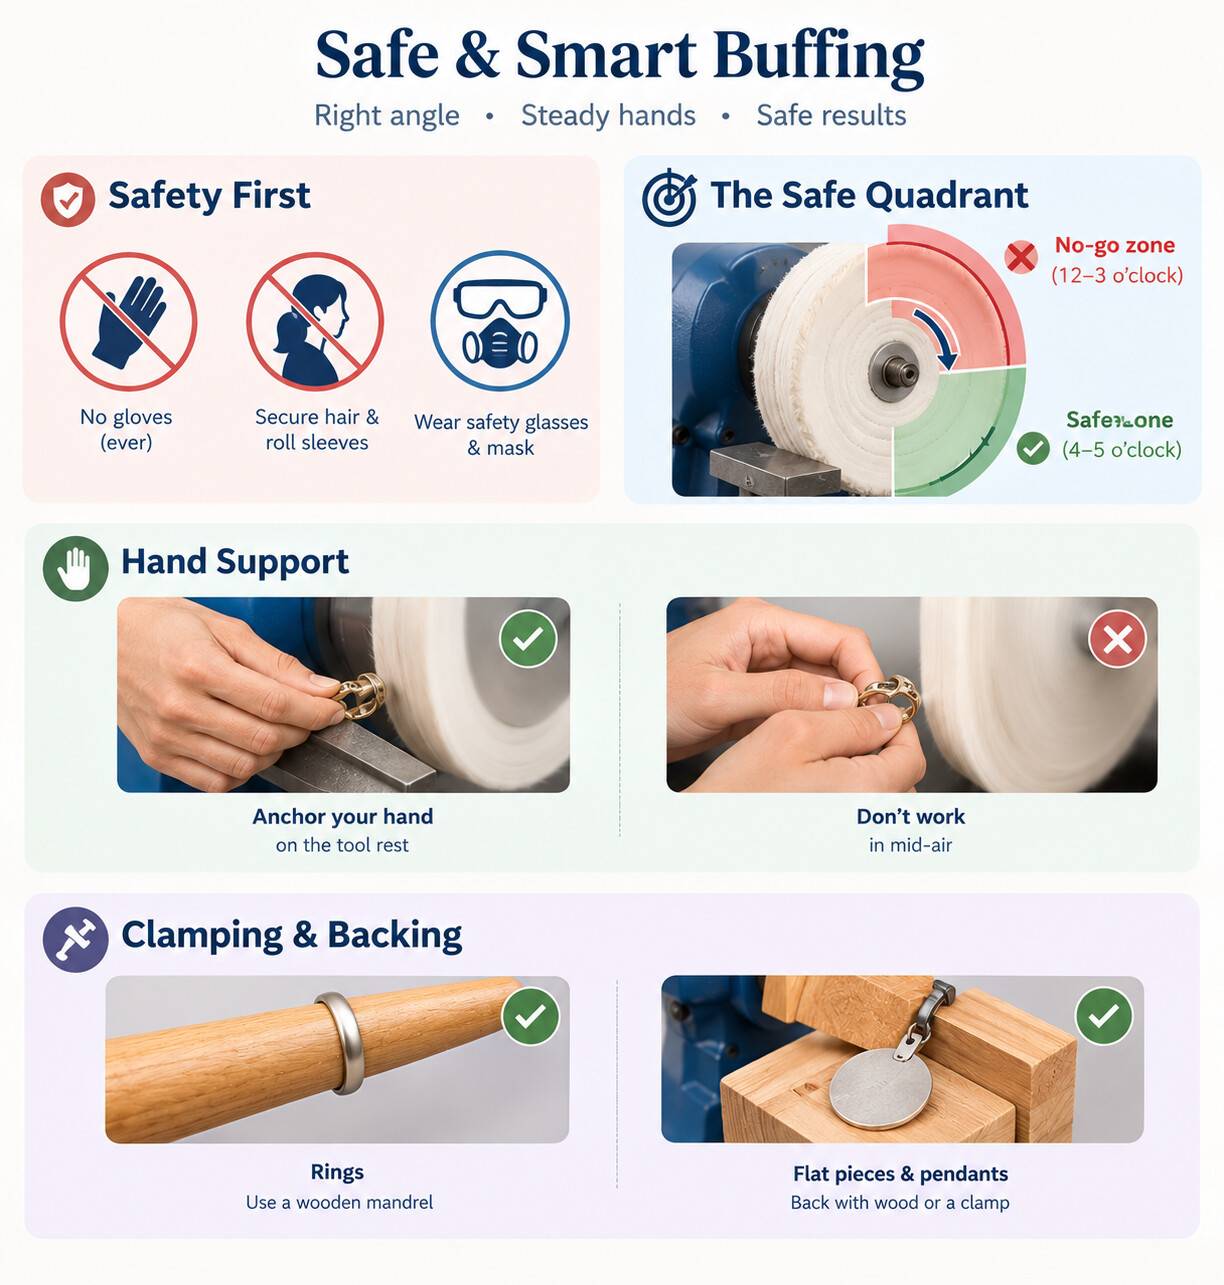
Because a bench grinder possesses high torque, proper contact geometry is the single factor that separates a flawless polish from a dangerous snag.
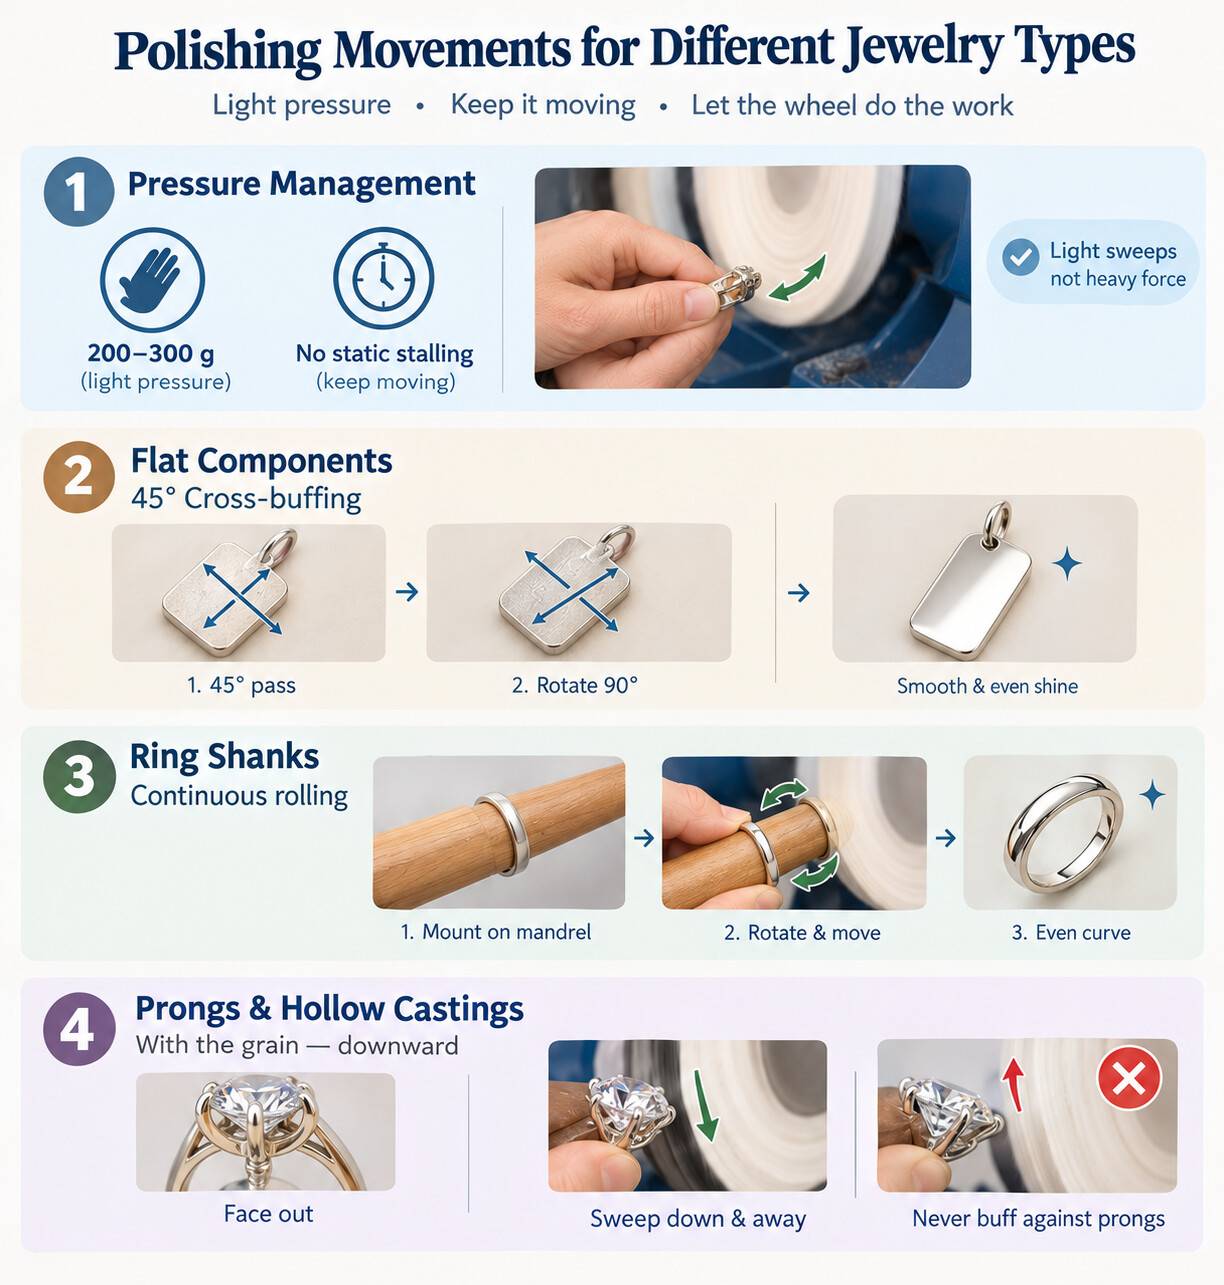
Effective jewelry polishing relies on the tangential linear speed of the wheel rather than muscle. Heavy pressure creates heat, warps fine metal, and degrades delicate contours.
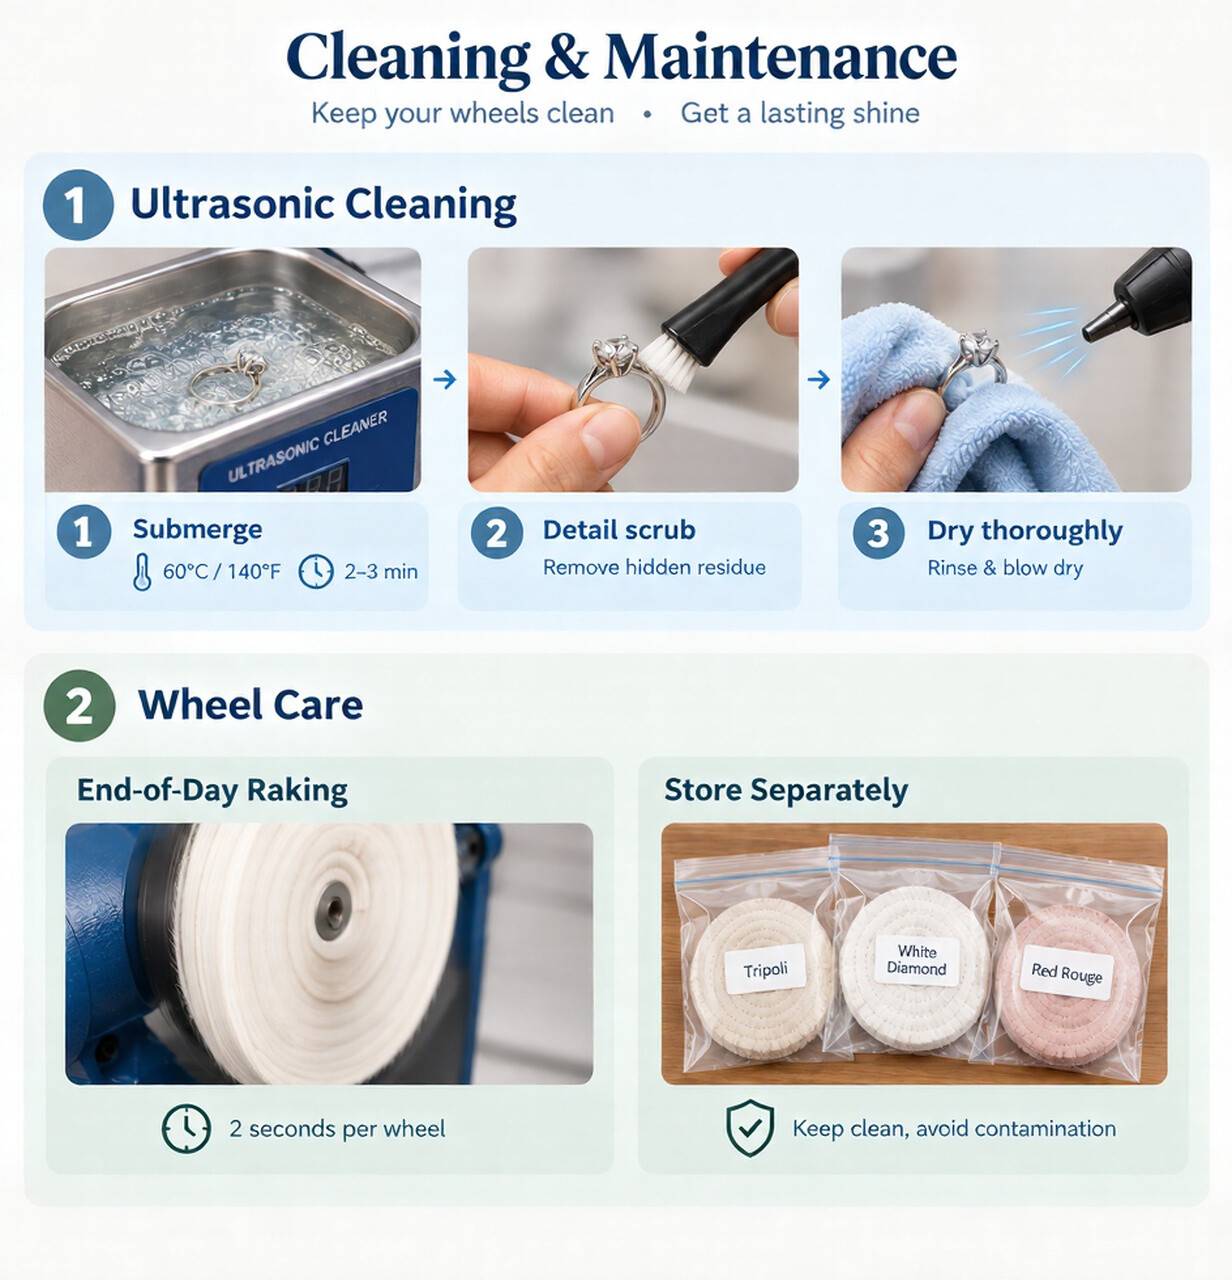
A mirror shine can be completely ruined by contaminated transition steps. Transferring cutting compounds into finishing wheels is the most common reason for persistent, cloudy surface scratches.
For professional goldsmiths, independent designers, and casting operations seeking durable finishing consumables, turn to Orobrush. As an industry-leading manufacturer and supplier of jewelry buffing wheels, Orobrush produces balanced stitched muslin discs, durable pre-polishing buffs, and premium flannel wheels engineered specifically for precious metal applications. Whether you need individual replacement supplies or want to place bulk B2B wholesale orders for your studio, explore the full collection of precision jewelry bench grinder buffing wheels at Orobrush to upgrade your workshop today.
1.Pairing the Right Buffing Wheel and Compound with Jewelry Metals
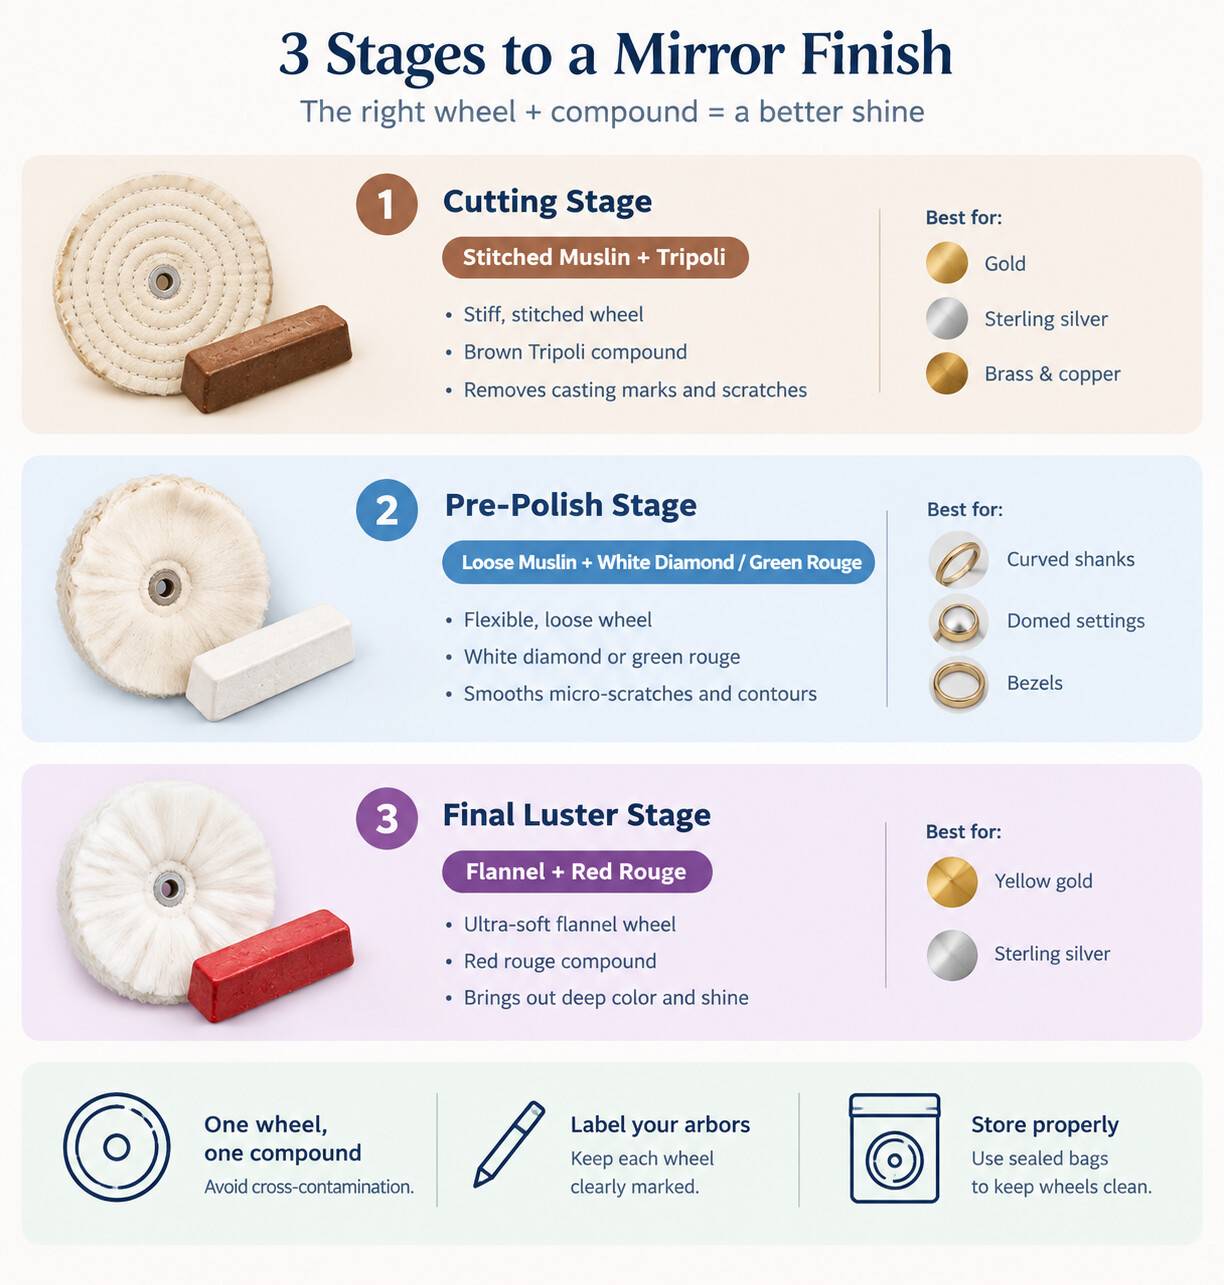
Achieving a true mirror finish requires a disciplined three-stage progression. Skipping grades or mismatching wheel density with the wrong abrasive will leave visible haze, micro-scratches, or flat spots on curved jewelry components.
Stitched Muslin Buff + Tripoli (The Cutting Stage)
- Wheel Texture: Multiple concentric circles of heavy machine stitching hold the cotton plies firmly together, creating a stiff, aggressive edge.
- Compound: Brown Tripoli (a fast-cutting microcrystalline silica compound).
- Application: Essential for the initial cut on gold, sterling silver, brass, and copper. This combination quickly levels casting porosity, files lines, and 400-to-600-grit sanding marks into an even, semi-gloss base.
Loose Muslin Buff + White Diamond or Green Rouge (The Pre-Polish Stage)
- Wheel Texture: Stitched solely around the center arbor hole, leaving the outer plies loose, compliant, and flexible.
- Compound: White Diamond (aluminum oxide blend) or Green Rouge (chromium oxide, tailored for platinum, stainless steel, and white gold).
- Application: Ideal for curved shanks, domed settings, and bezels. The loose plies conform to organic contours without faceting the metal, removing the hazy micro-grooves left by Tripoli.
Flannel Buff + Red Rouge (The Final Luster / Coloring Stage)
- Wheel Texture: Ultra-soft, unstitched combed flannel plies with zero inherent cutting ability.
- Compound: Red Rouge (ferric oxide micro-particles).
- Application: Dedicated strictly to bringing out the deep, radiant color and liquid-like mirror shine on yellow gold and sterling silver. Red Rouge does not abrade base metal; it burnishes the surface at a micro-level to produce maximum optical reflection.
Dedicated Wheels and Contamination Prevention
- One Buff, One Compound: Never apply multiple abrasive grades to a single wheel. A single coarse Tripoli grain embedded in a soft flannel wheel will permanently scratch a mirror finish.
- Label the Arbors: Use a permanent marker to clearly write the compound name (e.g., "TRIPOLI ONLY", "RED ROUGE") directly on the leather or fiber center of each wheel before mounting.
- Sealed Storage: Store dismounted wheels in individual, labeled zip-top plastic bags to prevent airborne workshop dust and grit from settling into the clean fibers.
2.Wheel Preparation: Mounting, Raking, and Charging
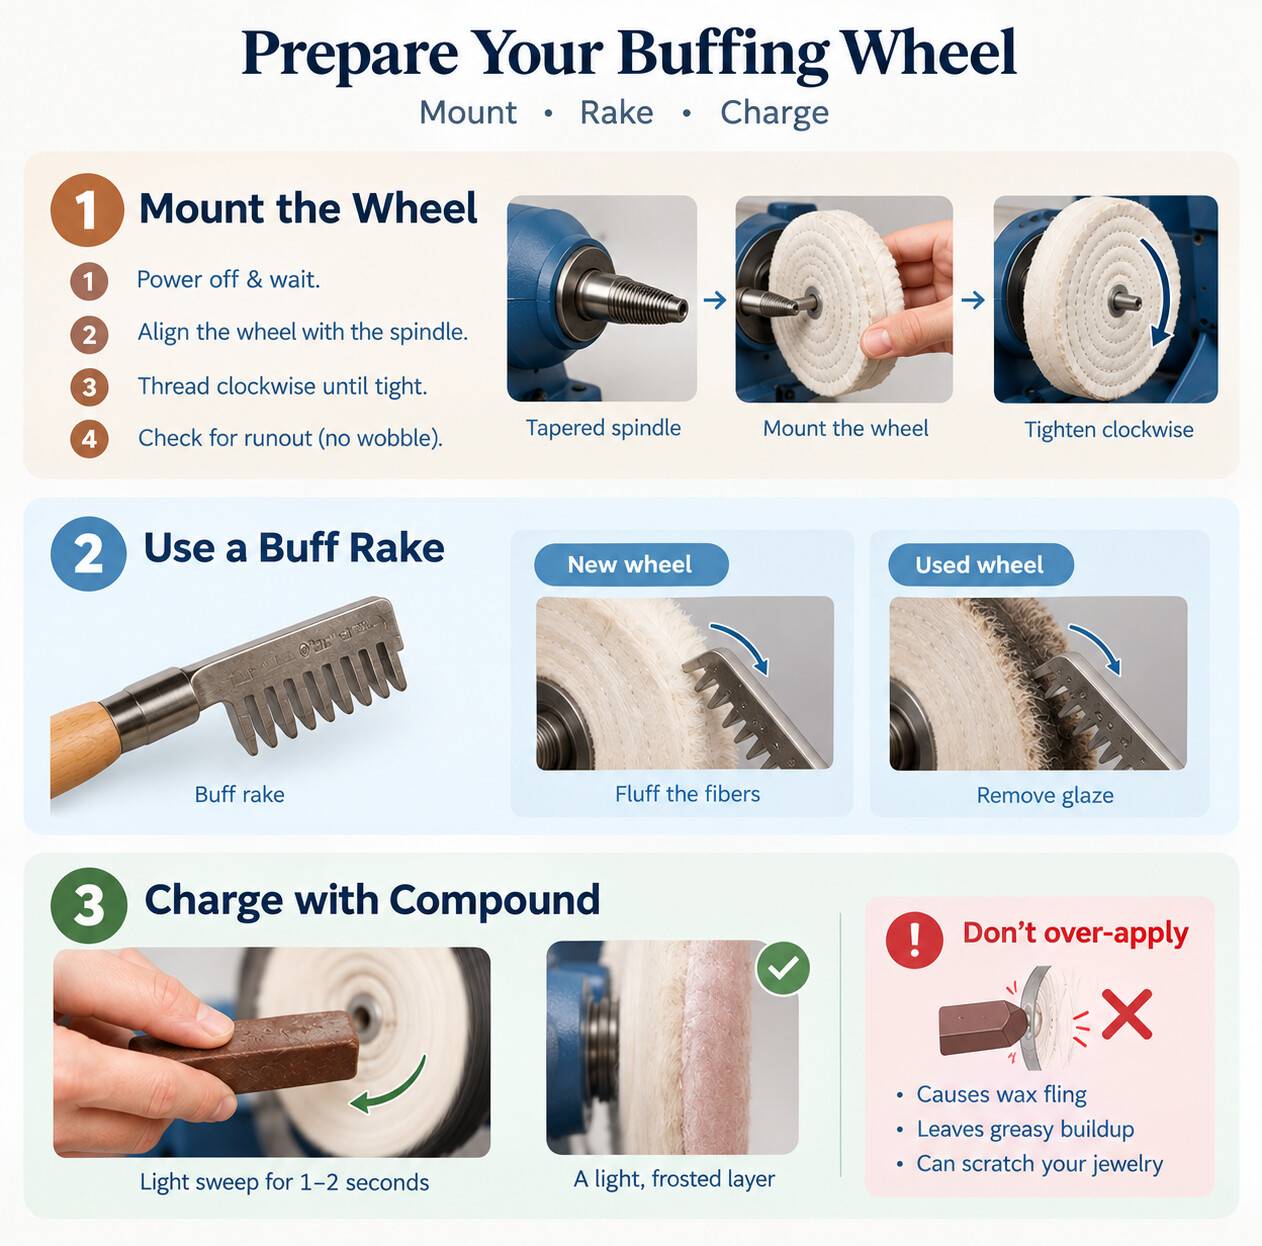
A buffing wheel cannot polish jewelry properly straight out of its packaging. It must be balanced on the machine, conditioned with a rake, and charged with the exact amount of abrasive wax to prevent drag marks.
Securing the Tapered Spindle
- Ensure the bench grinder is powered off and completely stationary before handling the arbor.
- Align the center hole of the buffing wheel with the tapered screw spindle (pigtail adapter).
- Thread the wheel clockwise toward the motor housing by hand until tight. The rotational direction of the motor will naturally pull and lock the wheel tighter during operation.
- Turn on the machine to check for runout. If the wheel wobbles laterally, turn off the motor, unthread the buff slightly, re-seat it, and spin it back on until the rim rotates dead true.
Breaking in and Cleaning the Wheel with a Buff Rake
A buff rake fitted with rigid steel teeth is the primary tool for maintaining wheel responsiveness.- Breaking in New Wheels: New wheels feature stiff, starched cotton edges that fling compound away instead of absorbing it. Anchor the buff rake against the machine rest and lightly touch the steel teeth to the lower edge of the rotating wheel for 2 to 3 seconds. This fluffs the outer fibers into a receptive, fleece-like nap.
- De-Glazing Used Wheels: Regular polishing causes hardened wax, burnt binder, and oxidized black metal mud to form a slick crust on the wheel rim. Press the rake firmly into the spinning rim to shear off this compacted glaze and expose fresh, clean cotton beneath.
Applying Polishing Compound Correctly
- The "Striking a Match" Motion: With the grinder running at full operational speed, hold the compound bar firmly with both hands. Sweep the bar lightly across the rotating wheel rim for 1 to 2 seconds.
- Evaluating Wheel State: The cotton face should exhibit a faint, frosted veil of the compound's color while remaining soft and breathable.
- Over-Application Warning: Never push the compound bar heavily into the wheel. Over-application saturates the plies, causes dangerous wax flinging, and leaves greasy black buildup across your jewelry seams.
3.The Physics of Contact: Angles, Support, and Grip
Because a bench grinder possesses high torque, proper contact geometry is the single factor that separates a flawless polish from a dangerous snag.
Critical Safety Rules for Jewelry Buffing
- NO GLOVES UNDER ANY CIRCUMSTANCE: Wearing fabric, leather, or latex gloves around a bench grinder is strictly prohibited. Loose fabric threads snag on rotating spindles instantly, causing severe entanglement injuries.
- No Hanging Hazards: Roll sleeves firmly above the elbows, tie back long hair securely, and remove rings, bracelets, and neck chains before switching on the machine.
- Always Wear PPE: Impact-rated safety glasses and an OSHA-rated particulate dust mask or respirator must be worn at all times to block airborne metal dust, fibers, and wax binders.
The "Safe Quadrant" (4 to 5 O'Clock Rule)
- The Safe Zone: Present your jewelry piece exclusively to the lower right quadrant of the wheel, between the 4 o'clock and 5 o'clock positions. In this sector, the downward rotation of the wheel naturally sweeps the piece toward the dust tray or table base.
- The Forbidden "No-Go Zone" (12 to 3 O'Clock): Never touch jewelry to the upper half of the buff. The wheel rotates upward here; if a prong or corner catches in the fabric, the piece will be ripped from your grip and violently projected upward (kickback) directly toward your face.
Establishing Hand Support
- Anchor Your Hands: Rest the hypothenar eminence (the fleshy outer heel of your palm) or the knuckle of your pinky finger firmly on the grinder's tool rest or dust hood lip.
- Finger-Joint Articulation: Use this planted contact point as a solid anchor, feeding the jewelry into the wheel using only gentle finger-joint movements. Never hold a piece in mid-air with unsupported, floating hands.
Workpiece Clamping and Backing
- Rings: Always mount rings on a stepped or tapered wooden ring mandrel. Never loop your bare fingers through the center of a ring while presenting it to a spinning buff.
- Flat Sheets and Pendants: Back thin sheet metal, charms, and pierced components against a flat hardwood support stick or clamp them inside a wooden hand vise. This keeps the edges flat and prevents the high-speed wheel from grabbing and folding thin metal.
4.Hands-on Polishing Movements for Different Jewelry Types
Effective jewelry polishing relies on the tangential linear speed of the wheel rather than muscle. Heavy pressure creates heat, warps fine metal, and degrades delicate contours.
Pressure Management: Light Sweeps Over Heavy Force
- Maintain 200–300 Grams of Pressure: This equates to the gentle pressure used to test the ripeness of a piece of fruit. Let the abrasive particles do the work.
- Avoid Static Stalling: Keep the jewelry moving continuously across the face of the wheel. Pausing on one spot for even two seconds creates immediate flat spots, burns the alloy, and anneals thin solder seams.
Flat Components: The 45-Degree Cross-Buffing Technique
- Diagonal Pass 1: Bring flat pendants or signet ring tables to the 4 o'clock position and sweep the metal smoothly along a 45-degree angle.
- Diagonal Pass 2: Rotate the piece 90 degrees and sweep across the opposite 45-degree angle.
- The Result: This cross-hatch movement quickly blends unidirectional scratch patterns, creating an optically flat, distortion-free reflection with no gouging or waviness.
Ring Shanks: The Continuous Rolling Technique
- Mount the ring firmly on a wooden mandrel.
- Present the shank to the 4 o'clock safe zone with uniform, light contact.
- Slowly and steadily rotate the mandrel between your thumb and forefinger while traversing the wheel side to side.
- Keep the ring constantly spinning on its axis to maintain crisp, uniform, and concentric curves without localized flatting.
Prongs and Hollow Castings: Directional "With-the-Grain" Buffing
- Face-Out Positioning: Mount the gem-set jewelry piece so the stones face out clearly toward you.
- Sweep Downward and Away: Always glide the wheel from the top of the crown downward along the slope of the prong tips.
- Never Buff Against Prongs: Never push a prong tip upward into the oncoming face of the buff. The spinning cotton plies will instantly hook under the prong, pry it open, and launch the gemstone into the workshop.
5. Intermediate Cleaning and Wheel Maintenance
A mirror shine can be completely ruined by contaminated transition steps. Transferring cutting compounds into finishing wheels is the most common reason for persistent, cloudy surface scratches.
Ultrasonic Cleaning Between Polishing Stages
- Submerge: Place the jewelry in an ultrasonic cleaner filled with warm water (60°C / 140°F) and a specialized jewelry wax-stripping detergent for 2 to 3 minutes.
- Detail Scrub: Use a soft-bristled brush to remove any caked, greasy black Tripoli residue hidden inside hollow galleries, setting backs, or undercuts.
- Dry Thoroughly: Rinse with clean water and blow dry completely with compressed air or a lint-free cloth before touching the metal to the next finer buffing wheel.
Post-Operation Wheel Care
- End-of-Day Raking: Before turning off your bench grinder, lightly touch the buff rake across each running wheel for two seconds. This expels embedded metal filings and prevents the compound wax from setting into a rock-hard glaze overnight.
- Contamination-Proof Bagging: Remove wheels from their spindles and store each grade inside an individual, sealed plastic container or labeled zip-top bag to keep workshop grinding dust from embedding in the fibers.
Conclusion: Achieving Professional Jewelry Finishes with the Right Tools
Equipping your bench grinder with the proper wheels, compounds, and mechanical habits transforms metal finishing from an unpredictable chore into an efficient, repeatable science. By selecting the correct buffing stages, staying within the lower safe contact quadrant, and maintaining light, dynamic pressure, you can consistently achieve brilliant, showroom-ready jewelry reflections on every piece.For professional goldsmiths, independent designers, and casting operations seeking durable finishing consumables, turn to Orobrush. As an industry-leading manufacturer and supplier of jewelry buffing wheels, Orobrush produces balanced stitched muslin discs, durable pre-polishing buffs, and premium flannel wheels engineered specifically for precious metal applications. Whether you need individual replacement supplies or want to place bulk B2B wholesale orders for your studio, explore the full collection of precision jewelry bench grinder buffing wheels at Orobrush to upgrade your workshop today.