

Industry News
How to Use Wet and Dry Sandpaper for Jewelry Polishing
You do not need costly machines to get a perfect shine. Hand tools work beautifully. Proper use of wet and dry sandpaper removes scratches and smooths solder joints. It builds the foundation for a flawless mirror finish. Dry sanding cuts fast. Wet sanding refines.
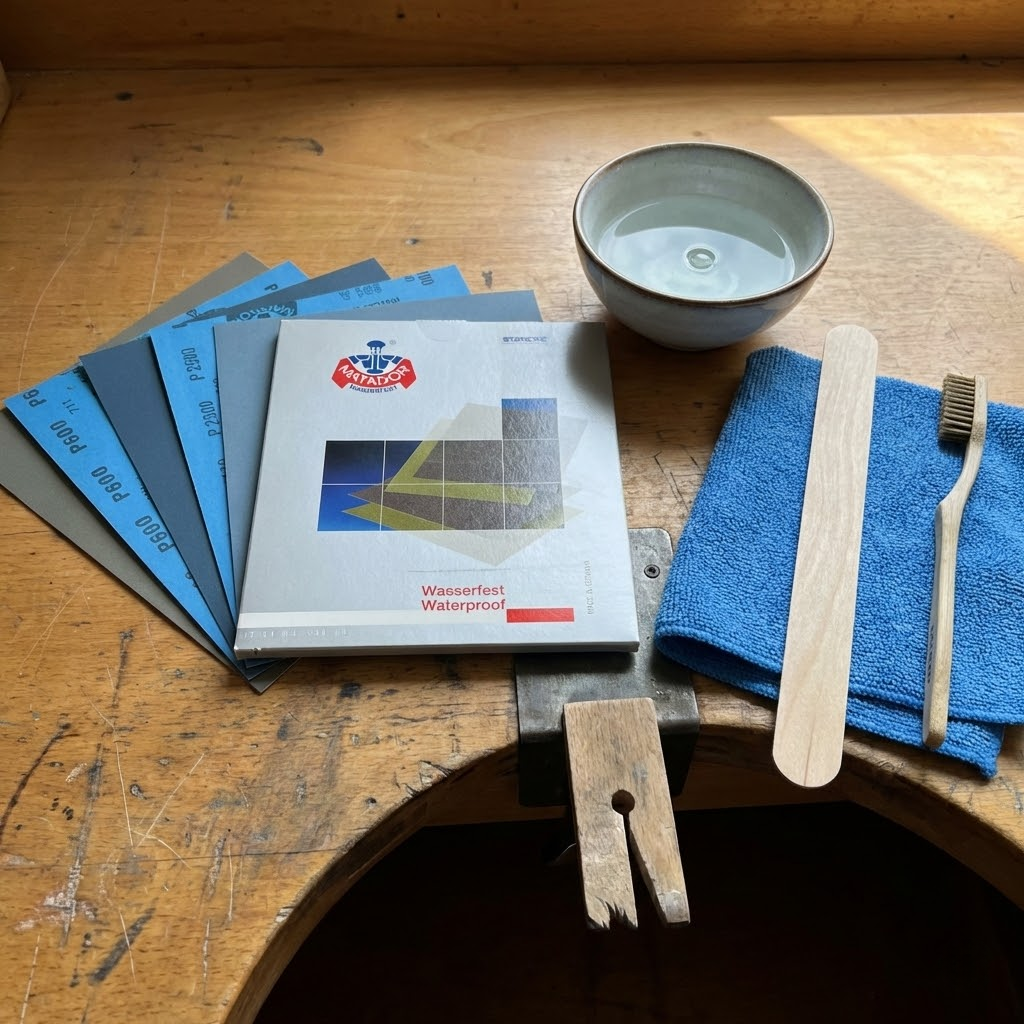
Having the right tools is critical. Here is your essential grit list:
Applicable grit: 800# - 2000#
Drop your paper into warm water for five minutes. This softens the stiff backing paper. Keep a few water droplets on the metal while you work. This activates the lubricating effect of water.
You likely skipped a grit, or you skipped the Dry Check. Use a bright lamp to find the bad spots. Drop down a grit size and sand it out completely.
Can I wet sand with regular wood sandpaper?
No. It will fall apart instantly. You must use waterproof silicon carbide paper. The latex backing loves water.
Is wet sanding different for gold and silver?
Yes. Gold is much softer. Press very lightly and let the grit do the cutting. Check it often so you don't remove too much material.
How long should I soak the paper?
Five full minutes. Warm water helps soften the paper so it wraps around sticks without cracking. Sharp, cracked folds will cut your metal.
Do I need compound after 3000 grit?
Yes. Sanding is the prep work. It makes the surface flat and leaves a satin finish. Polishing compound gives you that final mirror shine.
High-quality abrasives make the work easier. Bad paper rips, but good paper lasts. To achieve true professional results, visit Orobrush to explore our premium selection of Wet and Dry Sandpaper. Equip your bench with the right tools and master your finish today.
I.Preparation Stage

Having the right tools is critical. Here is your essential grit list:
- Low grit (240-400): Used for dry polishing. It shapes the raw metal.
- Medium grit (600-1200): The transition zone. Switch between wet and dry to smooth rough cuts.
- High grit (2000-3000+): Used for wet sanding. It preps the piece for final polish.
- Clean tap water.
- A drop of dish soap (reduces surface tension).
- A flat sanding stick.
- Microfiber cloth.
- A stiff toothbrush.
- A bench pin for support.
II.Core Practical Procedure: Step-by-Step Guide
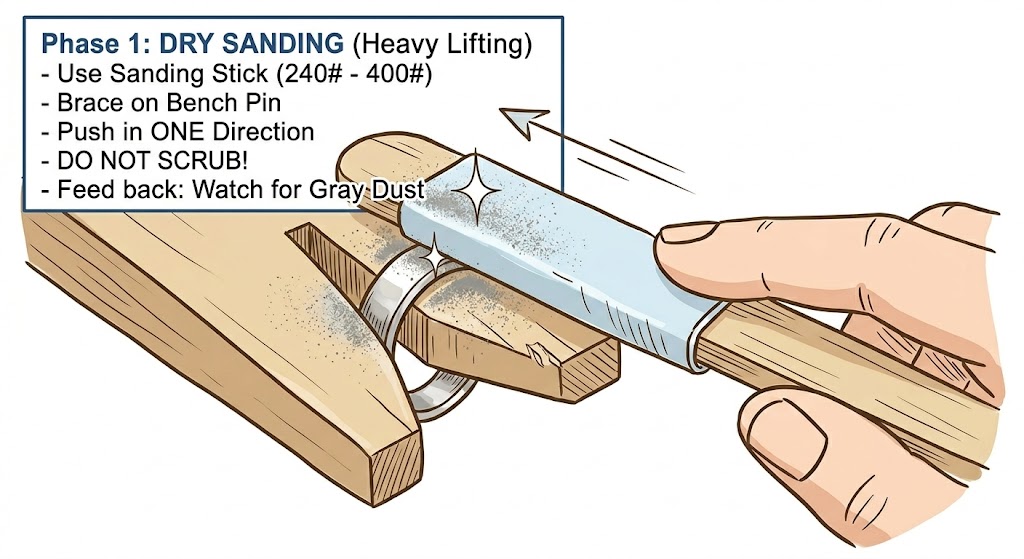
Phase 1: Dry Sanding – Heavy Lifting

- Applicable Grit: 240# - 400#
- Preparation: Always start completely dry. Wrap your paper tightly around a sanding stick.
- Method: Brace the jewelry against your bench pin for solid stability. Push the stick away from you using long, even strokes.
- Critical Warning: Do not scrub back and forth. Scrubbing digs deep, uneven grooves. This stage utilizes maximum cutting force to flatten raised weld points and remove fire scale.
- Feedback: Watch the gray dust for immediate feedback; it highlights the high spots on your metal. Clean the paper often with a stiff toothbrush to prevent clogging.
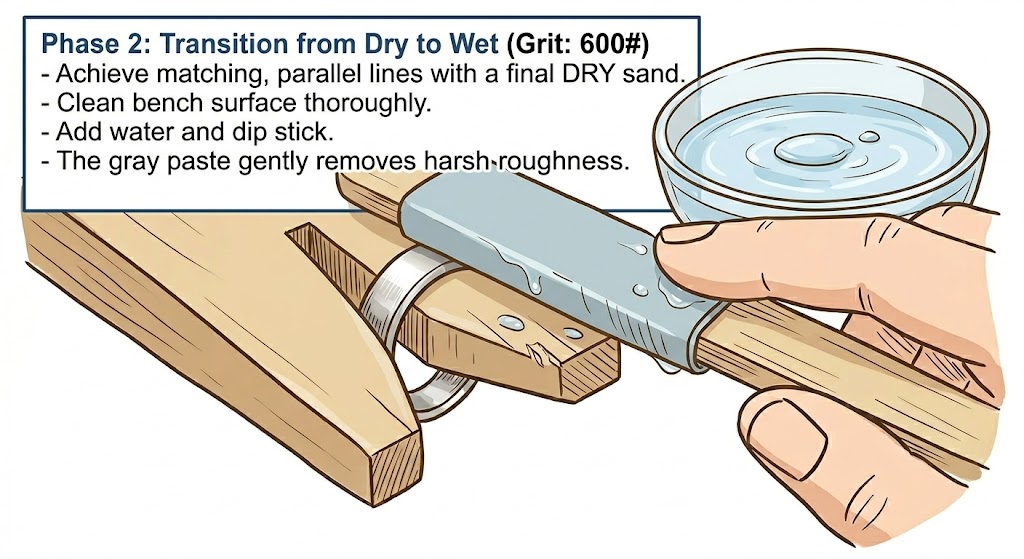
Phase 2: The Key Transition – From Dry to Wet

- Applicable Grit: 600#
- The Watershed Moment: First, dry sand the piece one last time, ensuring all scratch lines match perfectly.
- Transition: Wipe your bench clean and add water. Dip your stick and sand that exact same area.
- The Result: The water distributes the abrasive evenly. You will see a gray paste form. This paste is exactly what you want—it gently eliminates the harsh roughness left by the heavy lifting.
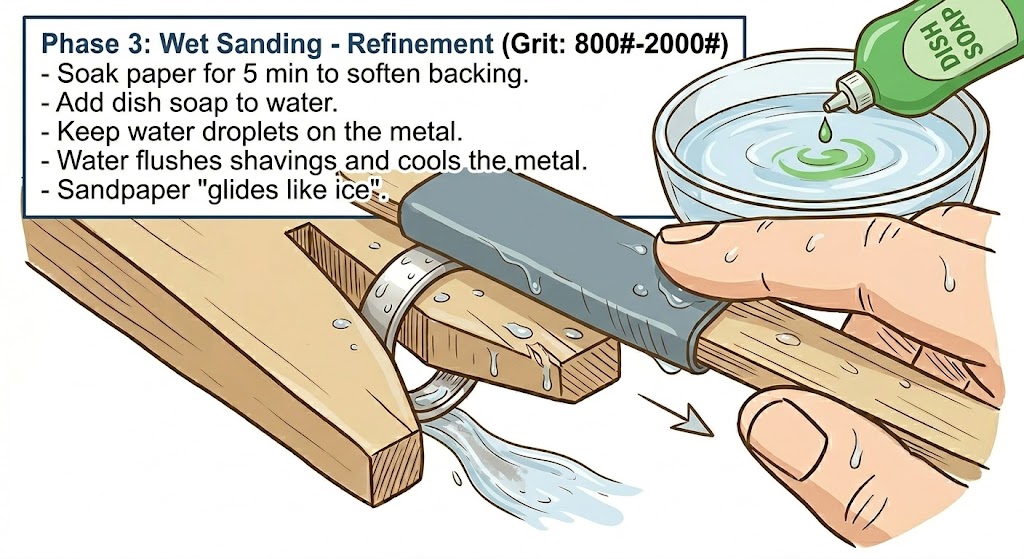
Phase 3: Wet Sanding – Refinement

Applicable grit: 800# - 2000#
Drop your paper into warm water for five minutes. This softens the stiff backing paper. Keep a few water droplets on the metal while you work. This activates the lubricating effect of water.
- No Secondary Damage: Water carries away metal shavings. It stops them from getting trapped under the paper and gouging your work.
- Cooling Down: It prevents heat buildup. High-speed friction is gone, so your silver or gold won't tarnish.
- The Specialty Trick: Add a drop of dish soap to your water. The sandpaper will adhere perfectly to the metal. It glides like ice, creating an extremely smooth feel.
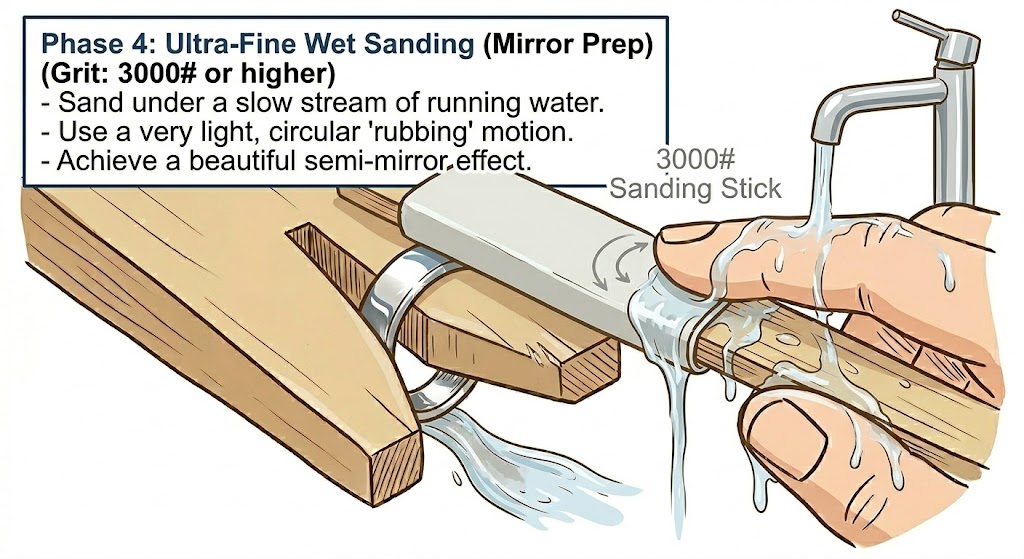
Phase 4: Ultra-Fine Wet Sanding – Mirror Prep

- Suitable Grit: 3000# or higher
- Environment: Keep the piece extremely wet. Sand it entirely under a slow stream of running water.
- The Touch: Use a very light touch. You are no longer "cutting" the metal; instead, you are "rubbing" the surface in gentle circles.
- Final Result: Wash off the slurry and dry with a soft cloth. You will instantly see a beautiful semi-mirror effect.
III.Pro Tips & Common Mistakes

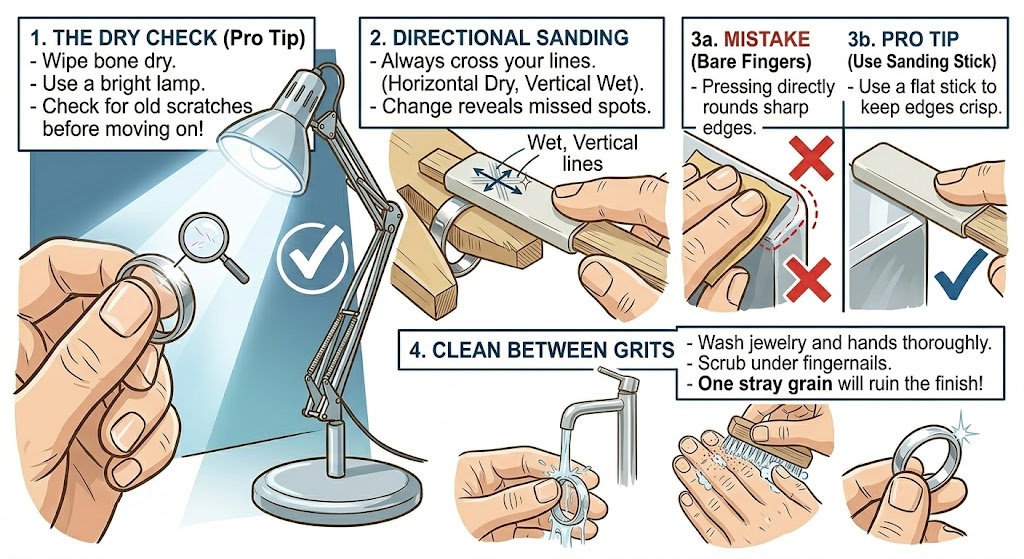
- The Dry Check: This is the most vital step! Water hides flaws and creates a "false shine." Wipe the piece bone dry. Hold it under a bright desk lamp. Look closely for deep gouges. Ensure no old scratches remain before moving on. Fix them now. Do not rush.
- Directional Sanding: Always cross your lines. Dry sand horizontally, then wet sand vertically. The change in direction immediately reveals missed spots.
- Preventing Rounding: Keep your edges crisp. Always use a flat sanding stick. Avoid pressing the paper directly with your bare fingers. Fingers are soft. They squish around edges and round them off. The jewelry loses its crispness.
- Inter-grade cleaning: Wash everything well. Rinse your jewelry and wash your hands before changing grit. Scrub under your fingernails. One stray piece of coarse grit will ruin your entire wet-polishing result.
IV. Frequently Asked Questions (FAQ)
Why are there still fine lines?You likely skipped a grit, or you skipped the Dry Check. Use a bright lamp to find the bad spots. Drop down a grit size and sand it out completely.
Can I wet sand with regular wood sandpaper?
No. It will fall apart instantly. You must use waterproof silicon carbide paper. The latex backing loves water.
Is wet sanding different for gold and silver?
Yes. Gold is much softer. Press very lightly and let the grit do the cutting. Check it often so you don't remove too much material.
How long should I soak the paper?
Five full minutes. Warm water helps soften the paper so it wraps around sticks without cracking. Sharp, cracked folds will cut your metal.
Do I need compound after 3000 grit?
Yes. Sanding is the prep work. It makes the surface flat and leaves a satin finish. Polishing compound gives you that final mirror shine.
Summary
Dry polishing prioritizes speed and shape. Wet polishing prioritizes refinement and shine. Follow this process step-by-step. Master the motion, let the grit do the work, and your jewelry will possess a captivating satin finish before the final polish.High-quality abrasives make the work easier. Bad paper rips, but good paper lasts. To achieve true professional results, visit Orobrush to explore our premium selection of Wet and Dry Sandpaper. Equip your bench with the right tools and master your finish today.